Custom labels in Google Shopping allow you to add filters to individual products in your feed, which you can use to manage campaigns, optimise bids and customise reports for better performance.
Out of the box, Google Shopping doesn’t give you much control over which products show in your ads but you can use custom labels to prioritise your most important items.
In this guide, we explain everything you need to know about custom labels for Google Shopping and how you can set them up to maximise the performance of your campaigns.
What are custom labels?
Custom labels are tags that you can add to individual products in your Google Shopping feed. You can use these to single out specific products or group related products together, allowing you to optimise bids based on your own defined criteria.
Here’s what Google has to say about custom labels.
“With Shopping campaigns, you can use custom labels when you want to subdivide the products in your campaign using values of your choosing. For example, you can use custom labels to indicate that products are seasonal, on clearance, best sellers, etc. These values can then be selected to use for monitoring, reporting, and bidding in your Shopping campaign.”
In Google Shopping, you can create product groups without using custom labels but you’re limited to using a select range of data points from your product feed, such as Item ID, Brand, Category and Product Type.
With custom labels, you can set your own filters to mark products as seasonal, high-demand, high-profit, underperforming or any label of your choosing.
This allows you to create and optimise campaigns based around your primary business goals, such as increasing bids for your most in-demand products and highest profit items or testing new ideas for campaigns that aren’t hitting targets.
Examples of custom labels in Google Shopping
In Google Shopping, you can define up to five custom labels, numbered from 0 to 4, and apply them to all relevant products in your feed. You need to define what each of these labels refers to and apply them consistently across your account so that, for example, custom_label_0 means the same thing everywhere.
You can then set values for each of these labels for every relevant product.
The easiest way to illustrate this is by looking at an example and our first task is to set definitions for our five custom labels (you don’t have to use all five).

This is actually the trickiest part of using custom labels because you can only set one definition for each custom label and these are applied across your entire account. Generally speaking, you want to create definitions that are related so that you can control various aspects related to demand, pricing, profitability or seasonality, for example.
In the example above (which we’ve borrowed from Google), you’ve got definitions set for the following five criteria:
- Season: The seasonality of products (summer, winter, Christmas, etc.)
- SellingRate: The popularity of products based on sales numbers.
- Clearance: Products that need to be sold to clear stock.
- Margin: The profit margin of items sold.
- ReleaseYear: This allows you to prioritise newly released items or older items before they’re outdated.
Next, you need to define your values for each of these labels and you can set multiple options for each label and choose which one to apply for each product in your feed.

For example, you can set LowMargin and HighMargin as values for one custom label and then you’ll have to choose which of these values to apply to each product in your feed. If you don’t want to apply any value to certain products, you can simply leave the cell for the relevant label blank on each of these products.
If you only have one value defined for a label, you either apply that value or leave or leave it blank.

So item #1 in the feed example above is labelled as a winter item, a best seller and low-margin product. We can now use these labels to target all products labelled with the same three values (Winter, BestSeller and LowMargin) or simply all products labelled as winter items, best sellers or any of the other values we’ve set.
How to use custom labels for Google Shopping
There are several ways you can apply custom labels to products in your feed but we’re going to focus our attention on doing this through Merchant Center.
The easiest way to do this is to create a supplemental feed including your custom labels. All you need to do is assign your labels to each product ID, submit your supplemental feed and this data will be added on to your primary feed.

Alternatively, you can edit your primary feed to include your custom labels and resubmit (make sure you know what you’re doing) and if you haven’t submitted your primary feed yet you can include your custom labels from day one.
Your other option is to use feed management software, such as Shoptimised, which makes it easy to edit your shopping feed without breaking anything.
To create a supplemental feed log into your Merchant Center account and then navigate to Products > Feeds in the left-hand navigation menu.

This takes you to the Primary feeds page and you’ll find the Supplemental feeds section at the bottom. Click on Add supplemental feed and you’ll be asked on the next page to name your feed and select how you want to submit your data.

It’s generally easiest to do this by connecting a Google Sheets doc but you can also upload a file from your computer. Once you’re done, click Continue and you’ll be asked to verify your account.
Next, you’ll have to create your spreadsheet or connect an existing one from Google Sheets and then click the Continue button once again.

Finally, you just need to add your supplemental feed to your primary feed by selecting the checkbox. All that’s left is to click the Create feed button and you’re all done.
Best practices for using custom labels in Google Shopping
Custom labels open up a deeper level of control over how your product listings show in Google Search. Let’s take a look at some best practices to help you get the best from custom labels in Google Shopping.
1. Determine which segments matter to your business
In many ways, the hardest part of using custom labels for Google Shopping campaigns is choosing which five (or fewer) segments group your products in the most effective way.
Here are some of the most common types of custom labels:
- Seasonal: If you release seasonal product rangers throughout the year.
- Profit: To prioritise the products that generate the most profit.
- Sales: To prioritise your best-selling items.
- Demand: To prioritise products that generate the most interest.
- Release date: If you regularly release new products and/or have old stock that needs to sell before it becomes irrelevant.
- Availability: If the availability of your products changes rapidly.
Generally speaking, profit-related custom labels are a solid strategy for any company running Google Shopping campaigns. Seasonal labels are important for a lot of retailers, too, but it should be fairly obvious whether you need to use these or not.
Depending on the nature of your business and what data you have available, you might identify other product groups that are important.
Let’s say customers who buy certain products are more likely to go on and make a second purchase within the next six months. In this case, it makes sense to create a label to group these products together and increase bids and maximise sales of these products and see how this impacts follow-up purchases.
If increased sales results boost repeat purchases and customer value, you’ve got yourself a winning strategy. If it doesn’t, you can simply remove this label and test out another hypothesis to maximise the overall return on your ad spend (ROAS).
2. Structure your campaigns
Once you’ve got custom labels added to your products, you can use them to structure your campaigns based on the product categories that matter most to your business. For example, if your stock is highly seasonal throughout the year, it makes sense to set custom values for the seasons and relevant holidays: summer, winter, Christmas, Valentine’s Day, etc.
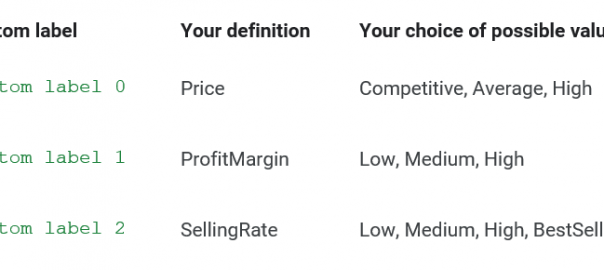
Another common strategy is to focus on profitability where you might create the following labels:

Using these labels, you can increase bids for your best-selling and high-profit items but you can also control bids for high-selling, low-profit products to boost the overall ROAS from your low-profit items.
You can also increase bids on your competitively priced items, knowing they may have the edge when sitting next to similar ads in the SERPs.
3. Track performance at the product level
In Merchant Center, you can build reports using your custom labels to gain deeper insights into campaign and product performance in Google Shopping. You can use these reports to test your expectations, such as your competitively-priced products being among your best performing ads – hopefully in terms of CTRs and conversions.
If this is the case, you might want to increase bids even further or even increase your total ad budget to capitalise on the opportunity. If this isn’t the case, you’ll want to investigate and determine why performance is lower than expected.
Surprising results aren’t necessarily a bad thing, though. You’ll often find new opportunities in your custom labels reports that bust misconceptions and help you direct more of your ad spend to the product groups and campaigns that are truly performing at the highest level.
Digital & Social Articles on Business 2 Community
(80)