
Back in the day (pre-marketing automation software), marketing didn’t require too many technical skills. It has become essential today for the savvy marketer to be able to both build and tweak email templates, landing pages or websites without needing to run to a developer. The two most commonly used technical skills for these tasks are HTML and CSS. The easiest explanation of the two is that HTML is the code you use to define the functionality of your site or template and CSS is what you use to dress it up and make it look good. From ironspider.ca: “You can think of CSS as the instructions that tell a web browser how to display your web page whereas HTML is intended to provide instructions on what to display on your web page.”
The purpose of this post is not to provide you with a crash course in basic HTML and CSS. I recommend checking out w3schools for that, it’s great for learning the basics as well as for quick syntax references. This post is meant to bring together the top 20 tips and tricks that you’ll probably need on a daily basis when building marketing assets.
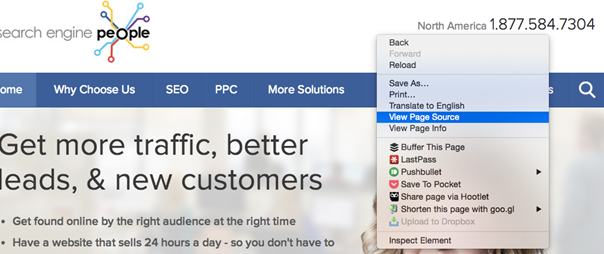
1. How To View The Back End Of Any Site (Chrome)
The first – most important thing you need to know is how to look at the source code for a site and how to inspect a specific element on a page. This will help you with identifying and trouble shooting issues and to understand how a site is coded.


2. Building And Understanding How Html Tables Work
Tables are the building blocks of your email templates and in general a crucial part of HTML that all marketers need to know.
Here is a very simple example table with 3 rows and two columns:

Below is the code for the table above. Read the comments in brown to understand how the table works. <!–Comments are in this format–>

3. Adding In Line Breaks <BR>
This simple rule has helped me with the most stubborn of text issues. When your text simply will not space properly – adding a line break or <br> will move your text to the next line.

Example from W3 Schools
4. Adding In A Horizontal Line <HR>
Adding in a horizontal line is a great way to separate different textboxes. It’s very commonly used in email newsletters or in landing pages where you want to separate rows.

Example from W3 Schools
5. Style A Horizontal Line With CSS
The default horizontal line <hr> will usually look odd with your design if you’re not using default fonts. While building a landing page recently, I found this handy site which has a few different styles of horizontal lines with the CSS class defined for you – you can simply copy and paste the code for the one you want to use into the head of your template and refer to it within the template.
In the example below – the top right column defines the hr style within the <head> and </head> tags. The left is the html, which references the hr style, and the bottom right is the result.

6. Identifying Colours And Font
It’s handy to know how to determine out the hex code of colors you find on the web. You can use the ColorZilla chrome extension to do this.

You can then use the font colour within your html or css: <font color=”#82B900″> or in creating images (word, powerpoint, photoshop are all examples of common programs that will let you colour elements with a specific hex code)
It’s also very useful to be able to identify font on different sites – WhatFont is great for this. Default fonts like Verdana can be referenced like this: <font face=”verdana” color=”green”>This is some text!</font>. You can also embed custom fonts using free Google Fonts – See #15 on how to do this.

Check out more useful chrome extensions for marketers in my previous post here)
7. Div Block For Gmail
Gmail sometimes adds extra space to table cells which only contain an image. To fix this issue you can add style=”display: block;” to your image tag like this: <img src=”image.jpg” style=”display: block;” />. Below is what it looks like before (Example from Campaign Monitor)

After:

8. Creating And Editing An Image URL
The example below shows how to add an image – include the alt tag and specify the height and width. The image tag below <img> specifies the source – a URL where your image is stored, the alt tag – which is what’s displayed in place of the image in the case of technical issues.

Example from W3 Schools
9. How To Add Margins
The example below shows how to specify margins and the result. In the image below – the second sentence on the right has a margin of 2cm (top) 4cm(right) 3cm(bottom) and 4 cm (left) defined like this: margin: 2cm 4cm 3cm 4cm.

Figure 1 Example from W3 Schools
10. How To Refer To A CSS Class Within HTML Elements
In the below example we first defined the “.center” class within the head. You can then set the h1 and p HTML elements to be class=center. This means that now your HTML tags are pulling in CSS formatting from the class you defined above.

Example from W3 Schools
In order to set a specific HTML element to use a class you can see below that I defined p.center to be the class. The h1 tag – will not be affected even if you reference the class center within the h1 tag. Only when you call class center within a p tag will it follow the rules defined for the center class.

Example from W3 Schools
11. How To Add CSS Styles
There are three ways to insert CSS styles. A style sheet can be created in any text editor and saved as a .css file. When a browser reads a style sheet, it will format the page elements as specified in that style sheet. The other option is to style individual HTML elements inline.
A. Internal Style Sheet
An internal style sheet is useful when a template has a unique style. You can define internal styles between the <head> and </head> section of your HTML within <style> tags.

Example from W3 Schools
B. External Style Sheet
An external style sheet is ideal if you want to apply and change the style for many different pages at once. You can embed an external style sheet into multiple pages like this:
<head>

<link rel=”stylesheet” type=”text/css” href=”myfilename.css”>

</head>
C. Inline Styles
By using inline styles, you can add specific styles to each element with your HTML. The style attribute can contain any CSS property. In the example below I’ve changed the the color and the left margin of a h1 element inline.

12. How Host Your Style Sheet In Google Drive
First upload your css file to google drive. Then share the file and set the permission to “Anyone on the Internet can find and view” or in the old version of drive “Public on the web”.

Grab the link – you’re going to need to modify it a bit. The share link should look something like:
https://docs.google.com/file/d/file_code/edit?usp=sharing
Now change the link to:
https://googledrive.com/host/file_code
In my example above:
https://drive.google.com/file/d/0B_Fv5uvm1EqoZ04wbzkxZ0NITEk/edit?usp=sharing
Becomes:
https://googledrive.com/host/0B_Fv5uvm1EqoZ04wbzkxZ0NITEk
To embed the external CSS file into your template:
13. Using Scalable Units
Using the unit “em” instead of px to make elements such as font, line height or margins scalable across a multitude of devices. The example below from W3 schools shows you how to set the font for the H1 tag to be 2em – this means that the font displayed will be two times the size of the browser’s default font.

The usefulness of the em unit isn’t limited to font sizes. Any lengths – including the padding and margins around elements can be specified in ems. This makes your templates scalable to any device size, which is crucial with the rapid growth of mobile browsing.
14. Padding
The image below from goer.org is a great explanation on how padding and margins work:

The definition from W3 schools shows you how to specify padding:

15. Using Google Fonts In Your CSS Styles
Google fonts are free open source fonts that you can reference in your CSS. After you select the fonts you want from https://www.google.com/fonts you can reference the style sheet within the <head> tags of your code. See the screenshot below.

You can then refer to these fonts when styling each element of your template. In the example below – I pulled in the “Lato” font by adding the code Google Fonts provided me and then used that to define the body, h1 and h2 styles :

16. Basic Tweaks To Make Your Template Responsive
To create a responsive HTML email header image that is fluid in all views on any devices, you should use HTML tables with embedded CSS of 100% width and a height of auto. You can take it one step further and add mobile media queries in your style sheet, which tells all mobile email client and browsers to display the content with the px width you set. This basic method can be applied to all images with in your HTML template, transforming them into responsive. (Hat Tip: SEP designer Nigel)
17. Building And Styling A Custom Form
An HTML form is created using <form> tags. You can then use the <input> tag to create various fields such as text fields, checkboxes, radio-buttons, submit buttons etc. An example field would be, <input type=”text”>. This defines a one-line input field that a user can enter text into. You can find a full list of fields you can create here.
Once it’s created, you’re going to want to style your form. I recently found this website which provides you with the code for a few different styled forms. In the example below you can see part of the code (this is just a snippet of it) and the form it produces under it.


In the example above, once you have defined the class in the head, you can refer to that style by adding the class to the <form> HTML tag like this:

18. How To Validate A Form And Display Error Messages Inline
This example will go over how to have a form return “This field is required” and highlight fields in red if the user leaves any blank.

I’ll admit I had to crowd source this one since I’m not very familiar with Javascript (thanks to our developer Scott) but I think it’s very useful to be able to implement this.
You need to add an event listener to the submit button so the script can execute before the form is submitted. After this you run through a loop check the required fields to make sure everything is filled out (You can do this easily by adding a specific class to each field you want to validate).
If there are any errors (fields not filled out) we’re going to have to set a flag saying there is. If that flag is set we have to prevent the form being submitted and add error highlighting for the end user. If there’s no errors we can proceed with the form as usual!
// The ID of the submit button on the form (in our example) was ‘get-quote’ so we bind our listener to that
jQuery(“#get-quote”).click(function() {// Declare and reset our error value each time the script runs
var error = false;//’input-validate’ is the class I would set on each of the fields I wanted to check
jQuery(“.input-validate”).each(function() {
// Get the value of the current item in the loop
var isSet = jQuery(this).val();// Check to see if the variable is an empty string or a null value
if (isSet == “” || isSet == null) {
// Indicates we found an error
error = true;
}
// This adds our user-facing error highlighting
// We run this within our .each() loop so we can use jQuery’s ‘this’ selector to modify the current item in the loop
If (error == true) {
// This adds a red border around the element with an error
jQuery(this).css(“borderColor”, “#ff0000”);// This changes the placeholder text of the form element
jQuery(this).attr(“placeholder”, “This field is required”);
}
// If no errors are found we need to remove our past error highlighting
else {
// This returns our borders to their original colour
// There’s no need to overwrite ‘placeholder’ this time because the user will have done that themselves
jQuery(this).css(“borderColor”, “#3c3c3c”);}
});// If we have any errors we need to stop the form from being submitted
If (error == true) {
event.preventDefault();
}
// If there are no errors we proceed with submission
else {
jQuery(“#get-quote”).submit();
}
});
Elements of the above code can be modified to fit your specific use case.
19. Image Alignment
To align an image all you need to do is add “bottom”, “middle”, “top”, “right” or “left to the <img> tag In the example below you can see what happens when we use these. Note that these are not supported in HTML 5(W3 Schools)

20. Colspan & Rowspan
Colspan allows you to create table data that spans multiple columns. In the example below you can see what happens when the data in the 4th row (“Total Savings: $200”) is set to span across two columns.


Rowspan allows you to create table data that spans multiple row. In the example below I’ve created an additional column called “Total Savings” and set the value “$200” to span two rows.


Conclusion
This is by no means a complete list of things you need to know. There are many resources that you can use to learn more but the most important thing is to practice. I learnt a lot by simply jumping in, making tweaks and previewing the results (Make sure you create a copy you can break without any repercussions). JS Fiddle is a free online tool that allows you to add HTML, CSS and Javascript and view the combined result. I used it to illustrate several examples in this post and I highly recommend using it to play around with code.
Happy building and breaking!
* Image work via Kaptain Kobold, nidhug
Sumayya is a Digital Marketing Specialist at Search Engine People. A graduate of Math & Business from the University of Waterloo, she’s a technology lover and digital marketing enthusiast.
20 Basic HTML & CSS Tricks Marketers Must Know
The post 20 Basic HTML & CSS Tricks Marketers Must Know appeared first on Search Engine People Blog.
(289)


