Mastering hidden Facebook features will help you get ahead of your competition.
Managing an active and successful Facebook page with a thriving community can be a daunting experience. As your fanbase grows, so does their insatiable appetite for content. Coupled with their comments, messages, questions, issues, etc., the time spent managing your page can grow exponentially.
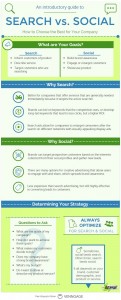
 The team at Post Planner created the great infographic at the bottom of this post that highlights some secret Facebook features that you can leverage to avoid being overwhelmed. I’ve expanded on their suggestions to help you master some hidden Facebook features that will help you gain new followers, create engagement, and increasing your profits.
1. Save articles on Facebook with “Save for Later”
The Facebook Save feature is a great tool that can help you curate relevant content that you can publish later on your Facebook page. You can save items like links, places, movies, TV, and music. Only you can see the items you save unless you choose to share them.
You can view the items you’ve saved at any time by going to your saved items in the “More” tab on mobile or by clicking the link on the left-hand side of Facebook on the web.
Your saved items list is organized by category and you can swipe right on each item to share it with your friends or move it into your archive list.
To save something you see on Facebook:
- From your newsfeed: Click
 and select Save

- From a Facebook Page: Click
 and then select Save
- From an event: Click
 Save
Save
- Note: You can’t save photos or posts without links.
To view the things you’ve saved on Facebook:
- Go to Facebook.com/saved or click Saved in the left menu of your homepage after you’ve saved something

Click a saved category at the top or click a saved item to view it
2. Leverage Facebook Interest Lists to stay organized
Interest lists are a way to organize and view the content you’re interested in on Facebook. You can create your own interest lists based on the things you care about, or follow other people’s lists.
Ideas for creating and segmenting interest lists:
- Create a Facebook list of top social media experts that features thought leaders’ Pages and public updates from the its members
- Create a Facebook list by industry, such as advertising, consumer goods, marketing
- Create a Facebook list by medium, e.g. traditional marketing vs. social media marketing
When you create or follow a list, you may also see some posts from that list in your main News Feed.
Your Facebook lists will also appear in the Interests section of your bookmarks. Simply click the list’s name to see all the recent posts and activity from the Pages and people featured in the list.
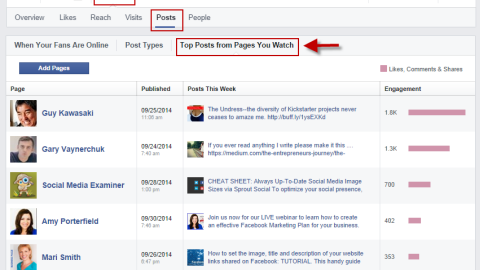
3. Monitor your competitors’ Facebook pages
Did you know that you can track your competitors’ pages with Facebook Insights? It’s an easy way to monitor their content.
If at least 100 people like your Facebook Page, you can create a list of Pages to watch:
- Click Insights at the top of your Page
- Scroll down to Pages to Watch and click Add Pages
- Search for a Page you want to watch or choose from suggested Pages and click Watch Page
- After choosing at least 5 Pages, click Done
- You can add up to 100 Pages to Watch, so don’t worry about running out of space.

Remember that when you add a Facebook Page to watch, the people who manage the Page will receive a notification — but it won’t include your name or the name of your Page.
Once you’ve added Pages to watch, you can see insights about these Pages. To stop watching a Page:
- Click Insights at the top of your Page
- Scroll down to Pages to Watch
- Hover over the Page you want to remove and click x
4. Download your Facebook history to analyze business analytics
You can download your entire Facebook history and use it to gain analytical insights. The downloadable data includes much of the same information available to you in your account and activity log, including your Timeline info, posts you have shared, messages, photos, etc. It also includes information that is not available simply by logging into your account, like the ads you have clicked on, data like the IP addresses that are logged when you log into or out of Facebook, and more.
- To download your information, go to your Settings and click Download a copy of your Facebook data.

5. Tag personal profiles to create more Facebook interaction
 Here’s a simple hack to tag people on your Facebook page, which will drive more interaction:
- Go to the status update box
- Start typing your message and when you get to the part you want to make clickable (has to be a page or profile) add the @ symbol, just as you would normally do on your personal Facebook page
- A dropdown menu will appear with a list of the pages and profiles you like/are connected to
- Select the profile or page
- Finish your message and update
- Note: you can’t tag any fan that also isn’t a friend of your personal profile.
6. Pin Facebook posts to the top of your timeline to increase visibility
Pinning a post to the top of your Facebook Timeline makes the content stand out from the pack. You need to be an admin or editor to pin Page posts.
To pin a post to the top of your Facebook Page’s Timeline:
- Go to the post on your Page’s Timeline
- Hover over the top-right corner of the post and click

- Select Pin to Top
Your pinned post will move to the top of your Page’s Timeline and ![]() will appear in the top-right corner of the post. Your pinned post will stay at the top of your Page’s Timeline for 7 days. After that, it will revert to the date it was published on your Page’s Timeline.
will appear in the top-right corner of the post. Your pinned post will stay at the top of your Page’s Timeline for 7 days. After that, it will revert to the date it was published on your Page’s Timeline.
Keep in mind that you can only pin posts created by your Facebook Page. Posts that other people add to your Page’s Timeline can’t be pinned.
7. Find evangelists and weed out fakes with your Facebook fan list
Here’s how to easily track your Facebook fans:
- Go to your Facebook page settings
- Click on “Banned Users” on the left sidebar
- Once you’ve done this, click on the menu that says “Banned” to reveal the dropdown menu
- Click on “People Who Like This”

8. Mark all Facebook notifications as “read” so you stop stressing out
Receiving constant Facebook notifications about unread notifications can drive you crazy. To stop this from happening:
- Go to your Facebook page settings
- Click on “Mark all notifications as read” in the top right corner
Easy, right?
9. Use Post Attribution settings to keep your identity intact
Ever post on your Facebook page and realize that you used the wrong identity? Use the default Post Attribution setting to solve the problem.
- Go to your page settings
- Click on “Post Attribution” in the left sidebar
- Select your preferred default identity

Now all of your future posts will keep your identity straight.
10. Save time by filtering your Facebook page posts by type
Trolling through a lot of Facebook page posts can be very time-consuming. Here’s how to filter Facebook post by type to save time and be more organized:
- Click on “Activity Log” in the left sidebar of your page settings
- Choose the appropriate post type to generate a specific list

11. Manage your Facebook ad notifications and emails to keep your inbox clear
- Go to Facebook ads manager
- Click on “Settings” in the left sidebar
- Scroll down to the Ads Emails Notification section
- Select the notifications you’d like to receive
12. Track Facebook Ad Relevance
To ensure that your Facebook ads are delivered to the appropriate audience (thus improving your ROI), you should track your relevance score.

Here’s how to see if you have access:
- Go to Ads Manager
- Click on “Campaigns” in the left sidebar
- Click on your Campaign name and go into the ad set
- Look at the 5th column from the right — if it’s there, you can track away!

(145)