
Email is still one of the quickest and easiest ways to get in front of people. That’s why inboxes are flooded with newsletters, notifications and more — inboxes are prime real estate. That’s why your messages have to stand out from the rest so that they boost user engagement and conversions.
This is where email split tests come in. Instead of relying on assumptions to make decisions, split tests give you concrete proof that one approach works better than another. You take two versions of an email and send them to two groups within your pool of users. Whichever version has the most opens, click-throughs or whatever, is the one you send to the rest of your users.
It’s a powerful way to make sure your email campaigns get your audience to take action, like buy something or sign up for a new service.
Here’s a detailed step-by-step walk-through of what the process looks like.
The Right Platform Is The Foundation Of Successful Split Tests
Back in the day of early email campaigns, you needed developers with tons of coding know-how to send anything. Now, with the right tools, it’s easy to send professional, well-organized email campaigns. The key is to find a platform that lets you:
- Design original emails from custom campaign templates
- Do real-time reporting
- Run analysis for promotional strategies
These are important because they help you design compelling emails, get good data back from them and then put that data to use. This is why you do split tests in the first place, so make sure you have the right tools before you start.
Here are a few tools you can use to run your split tests:
Campaign Monitor
It offers lots of options to create, send and analyze custom email campaigns. You have access to lots of features that make running split tests very easy. For example, choose from one of their many email templates to create emails that match your brand standards. Then customize them with their drag-and-drop feature to add items like images and call-to-action buttons. When you’re ready to send, use their custom A/B test feature to find the best subject line for your custom email. They let you pick your sample size and define the outcome you’re looking for — like high open rates.
Mailchimp
MailChimp helps you create campaigns quickly and easily. With their split testing feature, you can test subject lines, content, from name and send times. Once you’ve decided on the which variable to test, you can build up to three variations for each test all at once. They also let you choose your sample size and the metric that confirms the “winning” option.
Convertkit
This is an all-in-one platform for your email testing and marketing needs. It’s perfect for bloggers, startups and small businesses. Now you can test subject lines using their A/B test feature. Enter the subject lines you’re considering and they’ll run the test for you. After a few hours, whichever one has the highest open is the one they send to the rest of your subscribers.
A Guide To Running Email Split Tests
At some point you’ve probably received an email that interested you enough to open it. Maybe the subject line was catchy or had a compelling offer. Whatever it was, there was something about the email that got you to open it and click-through.
Chances are, it went through split or A/B testing. Variations might include small tweaks, like wording or image placement, or larger changes, like formatting. The tweaks depend on what you’re trying to get subscribers to do.
If you want to improve open rates, one variation might have a funny subject line vs. one with a question. If you want to increase click-throughs, the email body might test the size and placement of the call-to-action (CTA) button.
Whatever the goal is, two versions are sent to a small group of users. The one with the most opens, click-throughs or conversions is the one you send to all other subscribers.
Let’s take a closer look:
1. Create A New Campaign
Let’s say you want to test subject lines. To get started, in the “Campaigns” view in Campaign Monitor, click on “Create a new campaign.”
Click on the “A/B test” icon at the top of the page and choose the type of test you want to run. To test subject lines, click on the first option.

Give your campaign a name and then write the subject lines you want to test.

To personalize subscriber emails and boost open rates, click on “Insert personalization.”
Finally, add in sender information. You can play around with the name and email address you use. Depending on the relationship you have with subscribers, they’re more likely to open emails from names and addresses they trust.
2. Choose A Content Template
Choose a new template or choose one that you’ve used in the past. This is what you’ll use to customize the email content.

3. Choose The Recipients
Now it’s time to decide who’ll get the tests you’ve created. Choose what percent of your total subscriber list will get the emails. Subscribers in each group are randomly selected.

Then, set the parameters that decide which version is the “winner”. This can be open rate, total unique clicks or total clicks on a selected link. The final step is to set how long the test will run.
Don’t forget to review and send yourself test emails before you send to subscribers.
4. Send Email Split Test
When you’re ready, send the test. You can send it right away or choose a date and time in the future instead.

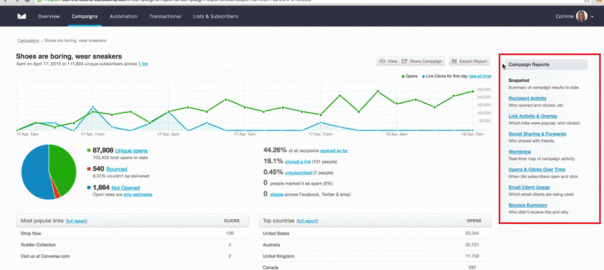
5. Monitor And Review The Results
Once you’ve sent your test, keep tabs on what recipients are doing. In the “Campaigns” view, click on the campaign you want to track to see a snapshot of metrics like bounces, opens and link clicks.

After the test wraps up, you’ll see which subject line had the most opens. Add the “winning” subject line to emails for the rest of your subscribers.
Use The Results For Killer Marketing Strategies
It’s not enough to simply have a winning subject line. You also have to build a strategy around it. Use the reports section of your platform to dig into specific parts of your campaign.

For example, reports in Campaign Monitor let you see which links were clicked on the most, which regions they came from and more.
Use this behavioural data to segment your email list and send out campaigns that are specific to each group.
Let’s say you notice a pattern between the time of day, region and open rates. Your email strategy for the rest of your users might look something like this:
- Email subscribers in region 1 between 11 am and 1 pm
- Email subscribers in region 2 between 2 pm – 5 pm
After you send each campaign, check your dashboard to see if open rates stay high or if you need to make adjustments.
Now It’s Your Turn
It’s easy to send and monitor email campaigns as long as you have the right platform and features to fit your needs.
Remember, email split testing is an ongoing process so learn how readers react and improve your emails. You only have a few seconds to grab their attention so use this process to find the right combination of variables to increase conversions.
* Adapted lead image: Public Domain, pixabay.com via getstencil.com
About the Author: Lisa Zheng
The post A Step By Step Guide To Email Testing appeared first on Search Engine People Blog.
(162)