Images drive engagement, build excitement over your posts, induce clicks, and drive traffic.
Unless you’ve been living under a rock for the past year or so, you know this. According the Jeff Bullas, articles with images get 94% more total views.
Hubspot cites evidence from 3M showing that 90% of the information the brain processes is visual (which is processed 60,000X faster than text).
No wonder a picture is worth a thousand words.
Crafting killer images
But, unless you’re a designer with lots of time on your hands, crafting killer images is a daily challenge. I frankly feel unworthy to even approach this topic because I’m such a novice — I don’t even feel like I have an artistic bone in my body. But I know there are lots of you out there facing the same challenge I do every day and this might help.
Sure, you can use some stock images, but they get expensive — especially since it’s common practice now to add multiple images to your blog content, not just a single image in the beginning. Using free stock photos often means using something that’s not quite right, plus it messes with your branding because these images are so overused you start to look like everyone else.
Sometimes you’re just forced to create your own images. But how?
I recently published a post showing 5 tools to create images without spending hours and buying expensive tools like Photoshop. If you didn’t see it, check it out here.
I ran across this infographic from Quicksprout that I thought added a lot to that post so I’m sharing it with you today. But, as is my way, I’m adding my own take on much of this.
Image types
Variety is the spice of life, so try using different types of images in your posts. I tend to use photos or images on an everyday basis, then spice things up with video, infographics and data visualizations, screenshots, and memes. I’ve used comics very rarely because I don’t think they fit my audience well.
That brings up an important topic we should consider before rushing off to craft killer images for our posts: branding.
Every image contains not only subtle clues about the content, but impacts your branding as well. So, think about the image you want to project and your target audience when choosing images to share. I recommend clients create a design guide to ensure a consistent brand across various social networks and other communications.
At a minimum, the design guide should include:
- Color scheme containing dominant color and at least 3 complimentary colors
- Fonts, including sizes in both px (pixels) and em (proportional for mobile). I highly recommend either a custom font or something unusual so your posts don’t look like everyone else’s. Google fonts are free and contain a vast variety of fonts. You’ll need several fonts — a dominant one you use for everyday and several fancy versions such as script to use to highlight.
 Photo filers to create consistency — I use PicMonkey to add some pizzazz to my photos and create a consistent brand. Check out the image to the right and compare that with the unedited image below. Okay, so I exaggerated this a little, but you see how I was able to add my dominant color to improve my branding. Plus, I increased the shadows on the people in the picture to avoid any privacy issues.
- I also add different sizes of the business logo to the design guide since you use these so often. That eliminates hunting for them every time you need them.
Here are some tricks of the trade for each type of image:
1. Photos and images
With smartphones everywhere, photos are easy to come by. And, they’re great for bringing a human touch to your posts. Folks love seeing pictures of your team in action or your cute little dog — for my part, I have a monster dog who outweighs me so I tend to avoid posting pictures of him. However, I did go to the Cherry Blossom Festival over the weekend and got some great shots of the blossoms in all their glory and the monuments as a backdrop.

Use photos as is or edit them using a tool like Photoshop, PicMonkey, or Preview.
2. Video
Your videos don’t have to be Hollywood quality, but you should ensure you have adequate lighting and the sound is good. Here are just a few options for video:
- Videotape a webinar or other training. Moz does a whiteboard every Friday and includes a transcript of the session. I love the transcript because I can scan it much faster than listening to the entire video. If I want, I can then watch the video or just skip to the sections I want. Plus, you need text for the Google Bot to help your SEO.
- Interview — I have software allowing me to capture an interview on Skpye or you can tape a Google Hangout to create a video of your interview. I edit these raw videos using Final Cut Pro, but you could use the free iMovie software to add captions and build the branding doughnut necessary for branding — a doughnut is the snippets of branding before and after the video.
- Customers using your product or testimonials.
- Insider story of the company.
- Convey information is an interesting way. Check out this video I created with PowToon.
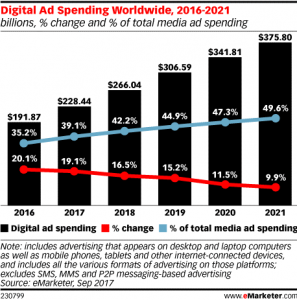
3. Infographics and data visualizations
There are lots of ways to include infographics and data visualizations in your content. Powerpoint can easily create data visualizations from almost any type of data. I use PiktoChart to easily craft infographics from data.
Or, you can just repost infographics or data visualizations published by others, as I’ve done here.
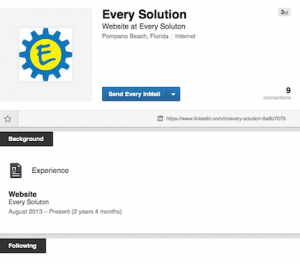
4. Screenshots
 Nothing beats a screenshot when you’re trying to illustrate something.
Screenshots are easy with Jing, a free product from TechSmith, the folks who bring you Camtasia. Notice in this screenshot, I was able to determine how much of the screen to capture and highlight the areas I wanted to draw your attention to. I could even add text to each of the arrow, change arrow colors and other great things right from the Jing toolbar.
 5. Memes
I think memes do especially well in social media posts because they almost beg to be shared. And, they’re super easy and fast.
I use Quickmemes. All you do is pick an image, add your captions, and share.
Of course, the downside is that the images tend to get over shared, so your meme doesn’t look all that exciting. Of course, you can upload your own image to caption. If I were working on the marketing team, I’d recommend they crowdsource images from users and offer the option to include the image in their library. Like Instagram, the result would be 1000’s of images available to caption.
Okay, now enjoy the infographic. You’ll find lots more information in it that I had time to talk about in today’s post. I’d love to hear your feedback.

Infographic courtesy of Quicksprout.
(242)