Google announced Postmaster Tools last month, but many email marketers aren’t fully utilizing it yet. Columnist Tom Sather explains how you can use the data it provides to overcome common deliverability issues.
![]()
Last month, Google made a major announcement about the introduction of Postmaster Tools that should have most email marketers rejoicing.
Similar to Outlook.com’s Smart Network Data Services (SNDS), Postmaster Tools by Gmail provides data for email marketers to analyze the performance of their email marketing efforts that, in turn, provide further clarity on issues that are preventing emails from reaching the inbox.
Here we’ll take a look at the steps needed to sign up for Postmaster Tools by Gmail, the data it provides, and how marketers can use this to troubleshoot common deliverability issues.
Signing Up For Postmaster Tools By Gmail
Signing up for Postmaster Tools is rather simple, but it’s not without its own challenges.
After going to postmaster.google.com and signing in using your Gmail account, you’ll be presented with a “welcome” box asking you to verify ownership of the mailing domain you are setting up.
Verification requires the ability to add a short snippet of text to your CNAME or TXT DNS record. If that sounds like Greek to you, you’ll want to send an email to your domain administrator asking for her or his help getting you set up.
After clicking “GET STARTED,” you’ll be asked for the domain you use to authenticate your email with Sender Policy Framework (SPF) or Domain Keys Identified Mail (DKIM). If you’re not authenticating your email with either, I recommend doing so first.
While it’s possible to move forward, you’ll be limited in what data you receive. It’s important to sign with both, but DKIM is the most important.
After entering the domain you authenticate with, you’ll be presented with the text to add to the TXT record of your domain. Most won’t have access to this, as mentioned previously, and will require coordination with domain administrators.

Once the TXT record has been updated, you can verify your ownership by clicking “verify.” If your domain is already being managed by Google Domains, however, you’re in luck, and logging in with your Google Domains account will automatically verify ownership of the domain.

If you have multiple sending domains, you’ll need to go through this process with each domain. If you want multiple people to have access to Postmaster Tools, this process will need to be done for each person and each sending domain.
Alternatively, you can create a general email account that can be shared among multiple people.
Understanding Postmaster Tools Dashboards
Now that we’ve set up Postmaster Tools, you’ll notice seven different dashboards:
- Spam Rate
- IP Reputation
- Domain Reputation
- Feedback Loop
- Authentication
- Encryption
- Delivery Errors
Spam Rate
The “Spam Rate” dashboard shows your complaint rate, or rate of user-generated spam complaints on your emails delivered to the inbox.
This shows the rate for the domain (versus the IP address), and authenticating your domain with DKIM is a requirement. Otherwise, this dashboard won’t show any data.

(Click to enlarge image.)
Domain and IP Reputation
Domain and IP reputations will appear under different dashboards, but the concepts are the same. Domain and IP reputations are calculated by looking at things sending history, volume and user feedback.
It’s important to note that IP reputation will only be shown in aggregate and not by individual IP addresses. It’s still key to monitor reputation by individual IP address using services like Sender Score, but senders using different mailing domains for different types of mail that round-robin all traffic through the same IP addresses can more easily pinpoint mail traffic with reputation issues.

(Click to enlarge image.)

(Click to enlarge image.)
Feedback Loop
The feedback loop (FBL) dashboard will allow senders to see FBL data by identifier. Gmail’s FBL requires a new x-header called the “Feedback-ID.”
The SenderID identifier is mandatory and should be unique to the sender across the mail stream. Senders can also choose up to three optional identifiers to help identify complaint issues.
Most senders will likely include a campaign ID and subscriber ID but could also include things like a list source ID, list segment ID or subscriber vintage ID to help identify problematic areas.

(Click to enlarge image.)
Authentication
If you’re signing up for Postmaster Tools, you’re required to authenticate your domains with either SPF or DKIM, but if you’re not signing with both, it’s strongly encouraged to do so.
This dashboard will also show demarkation point (DMARC) results, the standard to block spoofed or phishing domains. Like the other dashboards, it will only show aggregate data.
If you find you have a high number of SPF or DKIM failures, you’ll need a third-party reporting service to identify domains that are failing.
It’s interesting that Gmail is providing this data, as it shows how important it believes authentication and DMARC is to protecting the email ecosystem.
It’s also likely that Gmail is incorporating this into its reputation scores. There’s already some evidence that Gmail is flagging email as spam with failed records.

(Click to enlarge image.)
Encryption
Transport Layer Security (TLS) encryption ensures emails aren’t read or snooped on in transit (think NSA), but it requires that both the sender and receiver are using it to work. Gmail encrypts all email for its users now but wants more email senders and providers to adopt it so all email is safe.
The dashboard in Postmaster Tools will give you an idea of how much outbound and inbound email was encrypted. To learn more about TLS encryption, read Gmail’s page on safer email.

(Click to enlarge image.)
Delivery Errors
Most senders will find the Delivery Errors dashboard the most useful for gaining awareness as to why email was rejected or temporarily failed. For example, if you’re sending from a new IP address, you’ll know when you’ve exceeded volume thresholds, since you’ll see a “rate limit exceeded” warning.
This dashboard will answer the age-old question, “Is it my reputation or is it my content?” by telling you if your email content is spammy. It will also alert you if you are listed on a public blacklist that is preventing your mail from being delivered to Gmail subscribers.
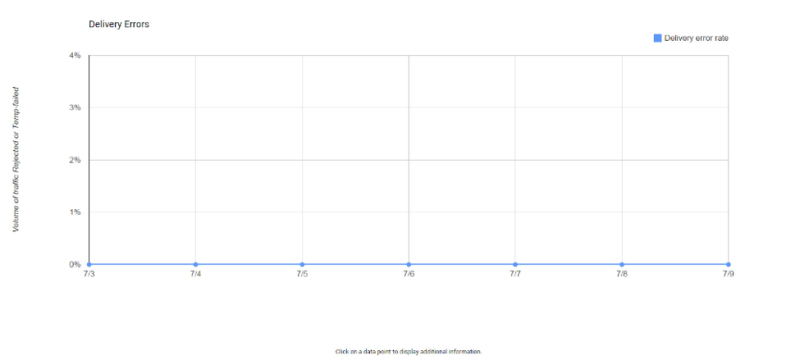
(Click to enlarge image.)
Postmaster Tools by Gmail will be extremely important for senders hoping to gain awareness of common deliverability failures. Sure, it may not solve your complaint problem or fix your authentication records, but at least Gmail is helping making email a safer and more enjoyable experience for everyone.
Some opinions expressed in this article may be those of a guest author and not necessarily Marketing Land. Staff authors are listed here.

(Some images used under license from Shutterstock.com.)
Marketing Land – Internet Marketing News, Strategies & Tips
(232)