September 15, 2016
I’m sure that you’re aware that these days online security is becoming more and more important.
Probably the most basic way of securing your website is to install an SSL Certificate and switch from HTTP to secure HTTPS Hosting.
In fact, switching to HTTPS is also good for your search engine ranking. The reason I can say that with a high degree of confidence is that Google has made this clear. They have categorically stated that HTTPS is a ranking factor.
Now that’s not to say that switching to HTTPS is going to magically push you up the rankings, but the direction of travel is clear – a secure website is vital going forward.
Now as a hosting company we have plenty of experience helping people migrate over to HTTPS so I wanted to share that experience with you so that it is as painless as possible.
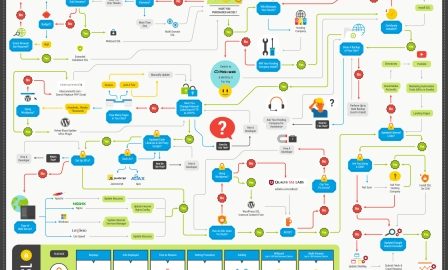
We’ve also produced this step by step graphic so you can visualize the process clearly.

Embedded from Pickaweb
Step 1: Buy An SSL Certificate
First up you’ll need to decide which SSL Certificate to buy. The first thing you’ll notice though is that there are loads of different types of certificate you can buy.
They all work in the same way – you don’t get better security by paying more. But there are certain features that you may want to consider as we shall show below.
If you just want a basic, low cost certificate then a Domain SSL is perfect for you. This covers one domain name and it is issued instantly so there is no paperwork. The padlock appears in the browser bar along with your domain name.
The next level up is the Organization SSL. This one requires a vetting procedure to verify that you are the domain owner and also some company verification and it takes a day or so to be issued. With this type of certificate your company and domain name appear in the browser bar along with the padlock for security.
Finally there is the Extended SSL which offers you the green browser bar showing your domain name and company details. With the Extended SSL more verification is required (legal, physical and operational) so this takes around 3 to 4 business days to be issued.
Step 2: Install Your SSL Certificate
As we have seen there are several types of SSL Certificate, but once you’ve purchased it you’ll need to approve it. With the Domain SSL that is just an email that is sent to one of a number of predefined email addresses (e.g. webmaster@your-domain.com).
If you manage your own server you’ll need to go through a few steps to generate the Certificate Signing Request (CSR).
Once approved you will be sent the SSL code for installation. If you’re on a shared hosting plan then it’s probably best to leave this to your hosting company. You may also require a dedicated IP address too for your certificate.
Step 3: Run A Full Backup Of Your Files
Whenever you’re making important changes it’s always good practice to run a full backup of your website files. If you use cPanel there is a backup feature you can use.
Step 4: Update All Internal HTTP Links to HTTPS
Because you’re switching your entire website to HTTP, if you have links in your site pointing to internal pages then you’ll need to modify them from HTTP to HTTPS.
This is just a process of going through your site and updating them. If your site is just a few pages then this is pretty straightforward and you can do them manually or get a designer to update them.
However if you have a large website with hundreds of pages then you probably want to automate this and there are tools that can do this for you.
Step 5: Update Other Code
If you’re using coding tools like JavaScript or Ajax you need to check that these have been updated. Normally if you have a small, non-complex site this step won’t affect you.
Step 6: Update External (Directory) Links And Social Media Accounts
If you have listings in directories that you can control like local listings then you should update these.
Don’t stress about this though because in the next step you’ll be setting up redirects which will automatically send HTTP traffic to HTTPS without any error messages. This is just for completeness to make sure you update links that you control.
Don’t forget to update your social media links too. These are valuable links to your homepage and they are free so be sure to update them as a priority.
Step 7: Set Up 301 Redirect
A 301 Redirect is just a way of permanently redirecting any traffic that goes from one page to another. In this case we are redirecting any traffic that goes to an HTTP page to go to the HTTPS equivalent.
With most websites this can be done by updating one file. If you use Apache or LiteSpeed hosting (probably the vast majority of Linux based websites) then you need to update the htaccess file.
If you’re using NGinx as your web server then you need to update the NGinx Config file.
If you are not technical or you are not comfortable with this then we would recommend getting an experienced developer or web professional to make the change for you.
Step 8: Update Your Content Delivery Network SSL (Optional)
This step only applies if your website is using a Content Delivery Network (CDN) like CloudFlare.
A CDN is basically a system whereby copies of your files are stored on a globally distributed set of servers so that the content is delivered to the person browsing from the server which is geographically closest to them.
A CDN can also be used to improve security by recognising patterns of Malware to prevent them from being uploaded to your site. A CDN therefore offers improved speed and security.
Some web hosting companies will offer free CDN services so just double check with them if you are not sure.
If you are on a CDN then you will need to refer to their instructions for ensuring that your SSL Certificate is recognised by their system
Step 9: Update 3rd Party Tools, Paid Search And Emails
If you use tools for services like Billing/Invoicing, email marketing, marketing automation or a Customer Relationship Management Tool then you need to go through them and update any links that are currently set to HTTP to HTTPS.
These could be internal links where your system is hosted or these could be links in emails that the system sends out such as transactional emails linking to a billing area or login area.
Of course setting the 301 redirect will take care of this but it just looks more professional to have the secure HTTPS links included correctly in your emails.
Also if you are using paid search with e.g Google, Facebook etc., just check the URLs of any landing pages you are using. Likewise if you use any landing page generators just check that your landing pages are all set to HTTPS.
Step 10: Update Google Analytics And Google Search Console
Finally, you mustn’t forget to update your Google accounts – Analytics and Search Console to make sure that they start to track your new site accordingly.
Wrap Up
Switching to HTTPS may not be top of everyone’s to-do list but security is becoming more and more important and it’s not just for Ecommerce websites – HTTPS is a Google ranking factor so sooner or later you will need to make the switch.
Once you’ve chosen the best SSL Certificate there are several steps to go through for a seamless transition. Of course, if you are not confident with these changes you should get an experienced web developer to assist you.
Digital & Social Articles on Business 2 Community(85)