
Google and the other search engines are better than ever at figuring out the nuances of language, and what a website, web page, or article is about. Even so, if you want to succeed online you still need to pay attention to SEO, and if you’re running a WordPress site, the best plugin for it is Yoast SEO.

It’s one of the handful of WordPress plugins we recommend, and we install it on all our WordPress sites.
One of the hallmarks of a good WordPress plugin is regular updates, and we tend to take those for granted. But Yoast SEO has just updated to version 3, and some of the changes are fairly dramatic.
Let’s take a look.
On Install
When you first install Yoast SEO, it takes you on a tour. A series of tooltips guides you through the most important areas of the plugin’s dashboard.

When you move to the next step in the tour, your screen automatically changes so you can follow along. If you ever want to see the tour again, it’s easy to reactivate it.
- Navigate to the Yoast SEO Dashboard / General tab
- Click Start Tour.
SEO Dashboard
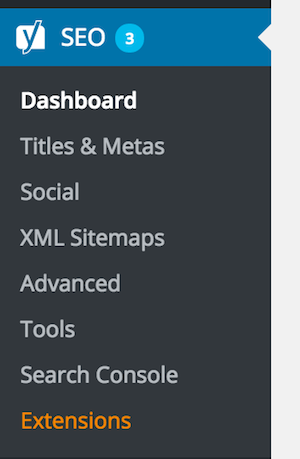
After you install and activate the plugin, you’ll see a new menu on your WordPress dashboard.
Select Dashboard.
Here’s one of the first improvements — the notices are huge and unmissable. If there’s a problem that’s going to affect the search engine’s ability to find or identify your site, it’s in your face.
This screenshot is from a site I use for testing, which I have set to discourage search engines.

In this case, the problem (blocking search engines) is what I want, but this notice would be invaluable if you were blocking them unintentionally!
Take another look at the SEO menu above — notice the circle next to “SEO” with the number 3 in it? That tells you there are three notices requiring attention.
Now, click the Help Center link near the top of the page. The plugin offers knowledge base help, videos, and email support (for premium members only), right there, inside WordPress. It’s content-specific, so you’ll see the help you need for the screen you’re looking at.

The Yoast SEO Dashboard includes five tabs:
- Dashboard
- General, where you can restart the Tour, see the latest changes to the plugin, and restore default settings
- Your Info, for the site name, and information about the company or person who owns it
- Webmaster Tools, for verifying and connecting your accounts with Google Webmaster Tools, as well as Bing’s and Yandex’s
- Security, for advanced changes. If you don’t know what these are, best to leave it disabled!
Titles & Metas
This is the area where you choose the default settings for the way you want to present information to the search engines. There are six tabs here:
- General
- Homepage
- Post Types
- Taxonomies
- Archives
- Other
Notice how, if you click the Help link on this page, it’s specific to the Titles & Metas section.

A good rule of thumb here — and throughout the plugin — if you don’t understand something, leave it on the default settings until you do!
Social
Here’s where you provide information about your social media accounts. Tabs include:
- Accounts
- Facebook
- Twitter
- Pinterest
- Google Plus
XML Sitemaps
Sitemaps help the search engines navigate through your site, and site changes will be registered more quickly when you have a good sitemap. Tabs in this section include:
- General
- User Sitemap
- Post Types
- Excluded Posts
- Taxonomies
Advanced
Once again, leave defaults until you understand exactly what these settings do. Tabs include:
- Breadcrumbs
- Permalinks
- RSS
Tools
The Tools page allows you to bulk edit titles and descriptions, rather than making changes on each page or post. Use this if you want to make universal changes.
It also includes an import/export function if you’re bringing in information from a different SEO plugin, or if you want to export your settings to another WordPress site.
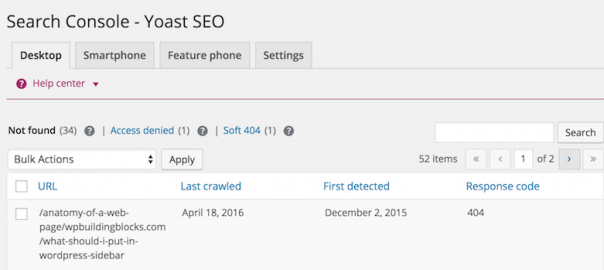
Search Console
This is a valuable tool, and using it will save you a lot of time. It mimics the Google Search Console, showing you the exact errors that Google shows. If you have paid for the Premium version of Yoast SEO ($ 69 annually for a single site), you can fix the errors right there, and they’ll also be fixed on the Search Console. If you don’t own the Premium version, you’ll have to fix them manually, but at least it identifies them for you from within WordPress.

The first three tabs mimic what Google Search Console displays, and the fourth handles your site’s connection with Google Search Console.
Extensions
The Extensions screen shows you all the premium add-ons available for Yoast SEO. It’s basically advertising for their paid SEO products.
Keyword Research
Not included in the Tour is a useful feature that’s easy to overlook.
Take a look at the top of your WordPress Dashboard. You’ll see the Yoast icon – it looks like this:

Notice the red circle with the number 3 in it — this icon is context sensitive and will change depending on what screen you’re on. If you’re in the edit screen for a post, it will glow green, amber, or red to indicate how good the SEO is for that post.
In this case, the numbered red circle indicates how many notices require your attention in the SEO Dashboard.
Hover your mouse over Keyword Research.

It lists three tools to help with keyword research:
- AdWords External takes you to the Google AdWords Keyword Planner.
- Google Insights links to Google Trends, where you can see the top trending keywords.
- SEO Book gives you access to a keyword suggestion tool, and provides information about SEO training.
SBI! for WP members have Brainstorm It! for keyword research, but if you’re not an SBI! for WP member, these are good places to begin your keyword research before you write new content.
Give SBI! for WP a try, and find out for yourself how thousands are using the tool to discover truly profitable keywords to target.
The SEO Settings link shows you the identical menu to what you see in the SEO menu in the WordPress Dashboard.

Using Yoast SEO on a Page or Post
Where the previous menus are mostly “set it and forget it,” this is the part of the plugin you’ll be using all the time.
Once you’ve written your content and composed a reader-attracting headline, it’s time for SEO. Scroll down below the editing area until you see something like this:

Note the Help Center link near the top — click it to view a brief video on using the tool to optimize your content.
Optimize Content
Immediately below the Help Center link is a symbol that looks like a traffic light. If it’s red, it means you’ve got some SEO work to do. Amber indicates you can do more, and green shows that your content is well optimized. It’s selected by default, and displays the content screen, divided into two sections:
- Readability
- Keyword
By default, it’s set to show the Keyword tab.
Keyword
This is where you’ll do most of your SEO work.
Before you do anything else, enter your focus keyword. This is the main keyword for your post. (If you own the premium version of the plugin, you can add additional keywords using the tab labeled “+”.)
For more information about focus keywords, click the ? symbol to the left of the text box.
By default, the snippet uses the first block of text in your post, but you can manually change that to create a snippet that will be more enticing for readers to click.
Click the Edit snippet button, and you’ll see this:

SEO title indicates that this post is set to show the post title, page number (if there is one), a separator (a dash in this case) and the name of the site. The colored bar underneath indicates that it’s long and Google may truncate it. If it’s a good length, the bar will be green.
The slug is what shows up in the page URL. You can also see it at the top of the screen.

Changes you make in Yoast SEO will show up here as well. It’s a good idea to include your focus keyword in the slug, which ensures your focus keyword is part of the URL for that post or page.
Meta description is probably the most important field on the form. If you do nothing, search results will show your first couple of sentences (around 155-160 characters in length). Often, though, that’s not the language that will encourage someone who’s searching to click the link. Use this space to craft a brief, benefits-rich description of what the post is about.
Below the focus keyword, Yoast will display an Analysis. A red light indicates need for improvement, an amber light tells you it’s something you might want to work on, and a green light indicates it’s good.
In this example, there’s also a grey light, next to the first item. This means it’s neither good nor bad, but it’s not a recommended practice so Yoast wants to draw attention to it.
Reading through all the recommendations will show you where to make changes, and help you do better in future.
Once you’ve gone through the entire Focus Keyword tab, switch over to Readability.
Readability
No, the plugin isn’t trying to fix your grammar or spelling here. Instead, it’s analyzing your text against known factors that make content easier to read online. This includes items like:
- Sentence length
- Paragraph length
- Passive vs. active voice
- Subheadings to break up blocks of text
- Flesch reading ease score
Here’s an example of a post that scored very well on readability.

Notice the little icons that look like eyes next to some of the results. Click on it, then scroll up to your post editor to see those areas highlighted.


Now you know exactly what you should change to improve readability!
Optimize Social Sharing
Below the traffic light is a sharing symbol. Click it to create individualized messages for Facebook and Twitter. Previous versions used to include Google Plus, but that’s no longer available. Yoast’s explanation is that, with the G+ social network on the decline, and with increasing conflicts between the metadata that Google and Facebook picked up, it was no longer useful. (Whether you agree with that is another issue.)

Here you can enter platform-specific information for sharing on Facebook or Twitter. If it’s blank, when readers share your content the plugin will provide the same information that Google search uses.
Tell the Robots What to Do
Below the traffic light is a gear symbol. Click it to open a new screen that gives instructions to robots. You should have set these up previously, in the Yoast SEO Dashboard, but you can change them here on a per-post/page basis.

Before You Hit the Publish Button
You can easily check to see how well you’ve handled your SEO for any post or page. Just look at the Publish widget.

Yoast shows you a rank for Content and for SEO — green means you’re good to go, amber indicates you could make some improvements, and red tells you to fix something before you hit the Publish button.
With its tight integration with Google Search Console, new features to help you improve content readability, and outstanding SEO analysis and guidance, the newest version of Yoast SEO continues its history of excellence.
Digital & Social Articles on Business 2 Community(83)