A project timeline is a key part of any project manager’s arsenal. Learn how to make one in this article.
Where does your project currently stand? How much work has been completed? How much remains to be done?
A project timeline answers all these questions. It visualizes the project’s progress, letting anyone – even laypeople – get a better understanding of the project.
That’s not all. A project timeline also shows task dependencies and estimates. Since it organizes all tasks chronologically, you also get a clearer sense of the project’s current status.
If you’re managing a project, creating a project timeline should be among your top priorities. This guide will show you how to go about it.
What is a Project Timeline?
At its heart, a timeline is simply a way to organize data chronologically. Instead of a tabular format, it represents this chronological data in a visual manner, making it easier to read.
As an example, think of someone like Albert Einstein. If you were to map his life’s achievements, you could create a table, like this:

Or you could organize it as a timeline that denotes key years and achievements visually, like this:

The latter is much easier to read. It is also more modular – you could branch off from each achievement or year to list other achievements.
This is the power of timelines and the reason why we use them in project management. Just like the timeline above, you can map a project’s key deliverables chronologically. For each deliverable, you can list its tasks and sub-deliverables.
Essentially, a timeline allows you to accommodate complex data in a visually succinct manner. You can organize the data chronologically, show dependencies, and even specify task ownership without resorting to hard-to-read tables.
Project Timeline Example
The best way to understand project timelines is with an example.
Let’s take a look one:

(Image Credit: Asana)
This example lists:
- Individual tasks and their estimated duration
- Task ownership
- The relationship between tasks
- Task start/end time
A well-made project timeline usually has all these elements.
Which brings up an important question: how does a project timeline differ from a Gantt chart?
Project Timeline vs Gantt Chart
Looking at the above example, you can easily confuse it with a Gantt chart. As we wrote on this topic earlier, a Gantt chart also shows task start/end dates, dependencies, and current status.
What separates a timeline from a Gantt chart is purpose.
The purpose of a Gantt chart is to:
- Show task relationships, especially dependencies
- Visualize current task and project progress
Essentially, a Gantt chart offers a much more granular view of the project. It is also bound by stricter “rules” (or rather, conventions). If a Gantt chart does not show the relationship between tasks, it isn’t really a Gantt chart at all (and most software tools – including Workamajig – will make sure to include this feature).
In contrast, the purpose of a project timeline is to show the overall task and project progress. While it can include task dependencies, that’s not the primary thrust.
Rather, the purpose is to give PMs a bird’s eye view of the project.
This effectively means that the project timeline can be as sparse or dense as necessary. It can look like the minimal “Albert Einstein timeline” I shared above. Or it can look like an information-rich list of tasks as in the above example.
Thus, while a project timeline can look like a Gantt chart, the opposite isn’t true.
In most projects, you’d create the Gantt chart and project timeline separately. The former will give you a closer understanding of individual tasks and the relationships between them. The latter will give you a top-down view of the project’s progress.
The question now is: how do you create a project timeline?
We’ll share a detailed guide below.
How to Create a Project Timeline
Regardless of how much (or how little) detail you want to include in your project timeline, your creation process will largely be the same. You’ll start by listing the broad objectives, then narrowing down until you get a definite list of tasks.
Based on experience, you’ll estimate the duration of each task and represent it on a visual timeline.
Let’s look at this process in more detail below.
1. Start with a broad outline
Scope statement, project brief, outline – whatever you call it, every project timeline needs to start with a clear understanding of the project’s overall vision and objectives.
This outline is an opportunity to truly understand what the project hopes to accomplish.
More importantly, it gives you an excuse to get all stakeholders together and understand what matters to them. This, in turn, can help you identify key milestones and progress markers in your project timeline.
The two most important ingredients in this outline are:
A. External and internal goals
Every project has an outright stated goal – the raison d’etre for its existence. This goal matters the most to the project’s sponsor. A project can have one or many goals, depending on its scope and scale.
Which is why you can call these external goals.
But your internal stakeholders also hope to accomplish something with the project. Maybe they see it as an early win that can help you win more business from the client. Or maybe they see it as a key driver of profitability for the agency.
As you can expect, these are your internal goals.
While external goals are generally easy to agree upon, internal goals often get sidelined. Make sure to include them in your project outline so you can tailor your project timeline accordingly.
B. Stakeholder preferences
What the project’s sponsors want is easy enough to estimate – it’s the stated objective of the project.
But in every project, you’ll also have stakeholders on either side jockeying to meet their private goals. These might be related to the project’s objectives. Or they might be completely tangential to them.
These demands can sometimes be translated into project goals, but often, they’re simply preferences. Like finishing one deliverable before schedule. Or accommodating a late change request because a key stakeholder really wants it.
It’s a good idea to understand all these preferences right at the start of the project. Know what kind of metrics matter to each stakeholder, their communication preferences, and which deliverables they care about the most.
This will help you create a project timeline that not only meets the project’s goals, but also keeps stakeholders happy.
Once you understand what you have to achieve (and the time frame in which to achieve them), you can start narrowing down your goals into deliverables.
2. List all deliverables
A project deliverable, as we wrote earlier, is a specific output created as a result of work done during a project.

For a deliverable to qualify as such, it has to meet two key requirements:
- It must be created as a result of deliberate work (i.e. a deliverable cannot be the by-product of another project’s effort)
- It must help in meeting the project’s goals in some meaningful way
Breaking project goals into deliverables is crucial for creating task lists and estimating time frames.
While top of the line deliverables are usually clear enough (a ‘car’ needs ‘wheels’, ‘engine’, and ‘suspension’), things become muddier as you break things down further. How do you decide what is just a “task” and what’s a deliverable? How do you organize secondary and tertiary deliverables?
That’s where the Work Breakdown Structure (WBS) comes in handy.
A WBS…:
“…defines all the things a project needs to accomplish, organized into multiple levels, and displayed graphically.”
Keep in mind that the WBS focuses only on deliverables, not the effort needed to produce them. A good rule of thumb is to categorize all the nouns as deliverables, all verbs as activities.

Thus, “Shoes” would be deliverable, but “cut leather” would be an activity.
Your goal should be to list all the deliverables necessary to meet a particular project objective. Organize them into different levels. Usually, the first and second levels will be your client-facing deliverables. The rest will be used internally to keep the project on track.
3. Estimate activities and the time needed to complete them
A list of deliverables (your WBS) tells you what to make. But it doesn’t tell you how to make them.
That’s the next step in the project timeline creation process.
Evaluate each top-level deliverable and list the activities needed to complete it. For instance, if you’re making a shoe, your activities might include:
- Cut leather
- Cut eyelets for laces
- Glue sole
- Stitch leather
In project management terms, this is called a “work package”. Since all the tasks in a work package are closely related and in the service of the same goal (creating a deliverable), it is often treated as a sub-project within the project.
If the work package is large enough, you can even assign a dedicated sub-project team to tackle it.
The next part is estimating the time needed to complete all the activities in a work package. This bit is crucial; get it wrong and your entire timeline will be off.
There are multiple tactics to estimate time requirements accurately. You can:
- Consult domain experts within your team (or outside it)
- Analyze past projects and evaluate the time taken to create similar deliverables
- Break down every activity into sub-tasks and estimate the time taken for each
Ideally, you’ll want to use all three approaches. It’s a good practice to add a generous margin to each estimate (consult your older projects to get an estimate).
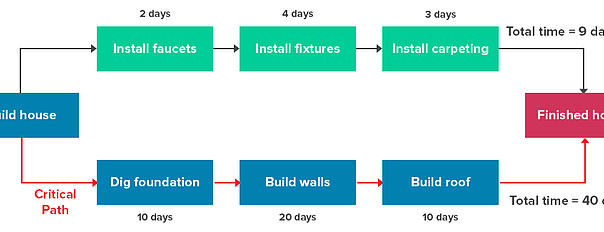
Use the critical path method to figure out the total time required for each deliverable. Under this method, tasks that take the longest to complete form a deliverable’s “critical path”. That’s the least amount of time it will take to produce the deliverable.

4. Identify milestones
Milestones are mutually agreed upon markers that show the project’s progress. They serve the same role their physical namesakes do on a road: they help you understand how far you’ve come, and how much further you have to go.
A milestone can be a project deliverable, but it doesn’t have to always be so. You’d decide on them with stakeholders right at the start of the project.
But let’s back up a moment – how exactly do you decide which milestones to use?
Once again, break down the project. Look for moments where an important deliverable is completed or a decision has to be made. Anything that you’d want your stakeholders to sit up and take notice.
Besides the start and end of the project, some commonly used milestones are:
- Handover from one team to another (say, from “design team” to “development team”)
- Handover from one stage to another (from “prototyping” to “testing”)
- Moments where important decisions have to be made. These decisions should require the stakeholder’s input
- Completion of key deliverables, particularly deliverables that rank high in a stakeholder’s priority list
- Completion of key phases in the project’s completion as per your (or your team’s) estimates – such as 25% or 50% completion.
There is no right or wrong way to select milestones. Anything that your team and stakeholders agree on is fair game.
5. Create your project timeline
If you’ve completed all the steps above, you’d now know:
- What tasks you have to complete and how much time they will take
- Your key deliverables and the tasks necessary to create them
- Key milestones that denote the project’s progress
That’s pretty much all you need to start creating your project timeline.
Your first step should be to select a timeframe. Depending on the project length, this can be in days, weeks, or even months.
Next, organize how timeline based on the priority of the deliverables. Mark out their duration, then, if necessary, do the same for all the secondary and tertiary deliverables associated with them.
Finally, add your milestones. These should be highly visible and should give you a bird’s eye view of the project’s progress.
Business & Finance Articles on Business 2 Community
(145)