
A sitemap isn’t just a guide visitors use to find specific pages on your website. It is a powerful tool for SEO as well. It is a list of URLs that you want Google to crawl and index. If you want your webpages to rank high on popular search engines, an XML sitemap is the best way to do it. Just follow these steps to create your own –
Step 1 – Identify the type of Sitemap you need
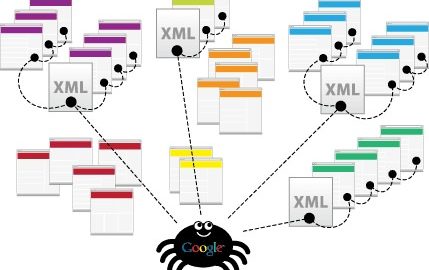
A standard XML sitemap is the first step. The next step is to choose specialized sitemaps for your website. This is important. If your website focuses on specific areas like videos, images, news articles or the like, your sitemap extension of choice should mimic it to improve traffic to these areas. There are basically types of specialized sitemaps that you can choose from –
1- Video
2 – Images
3 – News
4 – Mobile
5 – Standard Sitemap
6 – Sitemap Index (if you have multiple sitemaps)
Let’s say that your website promotes your Youtube videos. In this case, a standardized sitemap with a video sitemap would be your best choices.
Step 2 – Generating your Sitemap
Once you have chosen the type of sitemap you would like to work with, the next step is to generate it. Thankfully, online sitemap generators spare you from hand coding your sitemap. But keep in mind, your choice of generator also depends on several factors like –
• The number of pages you will be submitting
• Your CRMs
• The level of optimization you need for indexing
You can choose any one of two types of generators to create your XML sitemap:
1 – Generators that crawl your website – A good choice if you want to keep yourself updated on the status of any broken links, URLs and other aspects
2 – Backend based generators – These are CMS specific
Step 3 – Structure and Content
Determining the URLs that will go into your sitemap is the next step. URLs also have an impact on SEO so you want to get this right. A good rule of thumb is to find out which pages you want crawled and indexed first.
To structure your sitemap for the most gains, create separate sitemaps for every major level. For example, if you own an ecommerce website, your structure should include separate sitemaps that direct crawlers to your product pages.
Step 4 – Test
After you have created your sitemap, the next step is to test it. You can use free online tools and applications on the web to do so. Google Webmaster Tools is a good choice for free submissions. It will help you determine if your sitemap follows proper XML protocols.
But before you submit it to Google or any other search engine, make sure that it –
• Does not list pages that you do not want indexed
• Lists the pages that you want indexed
• Has tags that describe their respective URLs appropriately
Step 5 – Submitting your Sitemap
Once you have all of your checks and balances in place, the last step is to submit your completed sitemap. Make sure that you choose the best search engines. Webmasters consider Bing and Google as two of the best choices.
The best approach to creating an XML sitemap is a structured one. Follow these steps and you won’t have a problem creating a sitemap that search engines love.
Digital & Social Articles on Business 2 Community(105)