The idea of using images to tell a story is as old as cavemen drawing pictographs on walls. When books were invented, images were added to storybooks to bring tales to life. Now that the Internet has taken the world by storm, people are supplementing blog posts with visuals to be heard in a world filled with noise.
Knowing which images to add and where to add them is tricky. Splattering them haphazardly throughout the post could weaken the writing and steal from the message.
Before you hit publish, read this to understand how to add blog post images so they effectively convey your story.
The Introductory Blog Post Image (or Images)
One of the first things your audience will see is your headline. The headline should immediately be followed by a full-size image (or ‘top image’) to introduce your topic with visual appeal.
Full-size images take up the entire width of the blogging space. They captivate readers because they supplement the story you’re telling in your writing.
Where to Put Full Size Images
Once you have your full-size image (or images) carefully selected. Now, it’s time to add them to your post.
Because these images tend to be so big, it’s important to place them strategically.
Every post should have an introductory picture. This is a picture that sets the tone for what you’re about to discuss. Because it should give a big picture overview of the post’s information, it makes sense to put it under the main headline.
You can also add full-size images within the post. These will often be added underneath a main headline when introducing a new subtopic in your post. This breaks up your text and tells your reader something important is ahead. For people who skim (and most people are skimmers), this makes it easy to find the information most interesting to them.
Another option is to add a full-size post that depicts how something is done. These are effective when a simple picture is clearer than several paragraphs.

Showing a content plan is much easier than explaining what one would look like!
Supplemental Images
Throughout your post, you might have a few extra images you’d like to add. These images are meant to highlight certain areas of the content or explain your point in better detail.
The size of these images is flexible, but the typical supplemental image is 250 x 250 pixels.
Don’t add an image for the sake of adding an image. The picture you choose should be high quality and original. Limit the use of stock photos or you’ll dilute the quality of your content and your brand.
A few good ideas for original supplemental images include:
- Any picture you take with your camera;
- A screenshot to further explain a point;
- A chart or graphic you’ve designed.
If you want to have original images on your blog, but you’re not a first-class photographer, you’re in luck. There are a ton of tools out there that anyone can use. – Ginny Sosky, Shareaholic.com
Sprinkling Images Into Your Blog Appropriately
A picture tells a thousand words, but that doesn’t mean your reader wants your images to break up their reading flow.
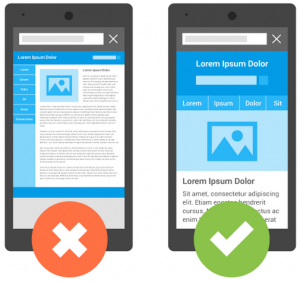
The way you sprinkle your images into your blog post matter. Mark this down as the golden rule of adding images to your blog post: Always align them to the right.
English speakers read from left to right. Our brain was trained from a very early age to consume information in this format. Breaking up the text with a left aligned image is distracting. It might seem like a subtle difference, but it can have a dramatic impact on your reader’s experience.
It also just looks bad. Left-aligned images don’t add value. Right-aligned images bring life to your content.
Placing Your Images
Once you’ve selected your images, place them strategically throughout your post. Then, before you hit publish, preview the post to make sure everything flows smoothly.
Are your most important points backed up with a full-size image? Do your supplemental images add value instead of working as a placeholder? Scroll through to make sure every blog post image is just as meaningful and poignant as your writing.
Want more tips about blogging? Check out the Content Marketing and Blog Post Checklists below for more information.
Hey, thanks for the info. Now what?
If you need any help with content creation, we have tons of free resources to get you over the hump. Please subscribe to this blog below to ensure that you never miss an article.
Have questions or comments? Please contact us by email or phone.
If you really enjoyed this post, please help us to spread the word by clicking one of the social media sharing buttons.
Thanks so much!
Digital & Social Articles on Business 2 Community
(58)