Note: Just a heads up, this is a long read.
“Marketing is no longer about the stuff that you make, but the stories you tell.” – @thisissethsblog
Marketing is all about storytelling these days. And video is the preferred medium of choice.
After all it’s not hard to see why.
52% of marketing professional worldwide name video as the type of content with the best ROI. – Source
But video is no longer the future, it’s the present. And all major trends seem to point towards the continued growth of it over the next few years.

But as a marketer, how do you create video content? And where do you start?
Flashback one year, and I was exactly in the same situation trying to figure out how I could create video content. I knew videos were important, and I knew I needed to learn how to make them, but how to get started?
More importantly, how can you make videos in a sustainable, cost-effective manner?
That’s when I was introduced to the world of animated video
(Full disclosure: I’m currently a Marketing Associate at GoAnimate, a DIY video animation platform).
Why Animated Video

Animated video differs from other video in that it doesn’t require actors, film crews, or any of the physical components involved with live-action videos.
The growth in do-it-yourself video animation platforms has made it easier than ever to create fun, engaging content without being limited by external factors.
There are couple of reasons why animated video works better than live-action videos:
Appeals to the senses
You have probably read / heard about the importance of visual content and this extends to videos as well.
The simple fact is: visuals trump all other senses.

Image created in Pablo. Stat from HubSpot.
Psychological impact
People connect emotionally with animated illustrations. We all have fond memories of Saturday cartoons growing up.
Cartoon’s are fun and engaging. The same goes for animated videos.
Scales with your business
Perhaps one of the greater benefits of animated video is the fact that it’s flexible.
You can change videos to easily reflect your brand image, keeping it consistent with all the other content you create. And animated videos can change and grow with your business because it doesn’t depend on any external factors.
Take for example Flo from the Progressive Insurance commercials? Unless you plan on hiring an actor like Flo and keeping him/her on retainer, you’re going to see a fair amount of turnover in your videos.
But bring in an animated character and there’s no limitations. You don’t have to worry about hiring a camera crew, finding a film location or any other factors that can keep changing.
Limitless possibilities.
Animated videos also give you more flexibility with the themes and style you use.
Want to create an e-learning video with whiteboard animation? Not a problem. Want something more dynamic for top of the funnel prospects? Just pick the theme and go.
There is no limit to production when it comes to animated videos, except your own imagination.
Cut through the noise
The growth in digital content has led to a lot of “noise” and marketers struggle to create great content. But with animated videos you can set yourself apart from the crowd.
Create a story that addresses specific pain points and then animate it in a fun, engaging manner.
De-mystify new things
Introducing ideas is a challenge. Especially if your audience needs to allocate significant time to learn that new idea.
With animated video you can build a world around the new idea you are trying to introduce. This can make learning a lot easier because it’s presented in a fun way.
This is important to note when you’re trying to make sense of abstract concepts. For example, imagine you want to showcase something like Content Marketing, just create a video.
Here’s an example:
Take your visual content to the next level
Infographics were all the rage a few years ago (it still is to some extent). But there has been a decline in the adoption of infographics by companies.
Fight the curve, by animating your infographics as a video infographic.
Let’s get started
You can use animated video to visualize data, build content for leads in your sales funnel, or simply create a thank you note for customers.
The point is that with animated videos your options are endless!
But as with any content, how do you get started creating animated video? And what do you need to know about the process beforehand?
In an attempt to simplify the process, I have created a step-by-step guide (with best practices) to walk you through it.
But before we start, there are a couple of caveats to note:
- This process is for anyone looking to make videos on a budget. If you can’t afford an agency or freelancer and want to create animated videos yourself, this guide is for you.
- This guide was created for folks that are using a third-party video animation platform like Animoto, GoAnimate, Moovly, or Powtoons.
1) Writing A Script
The very first step in the video making process is to write your script. Think of your script as the blueprint to your video.
It helps you identify the main points you want to talk about, helps you create the animation itself and most importantly tells your story. Here are some tips to get you started:
Bottom Line on Top (BLOT)
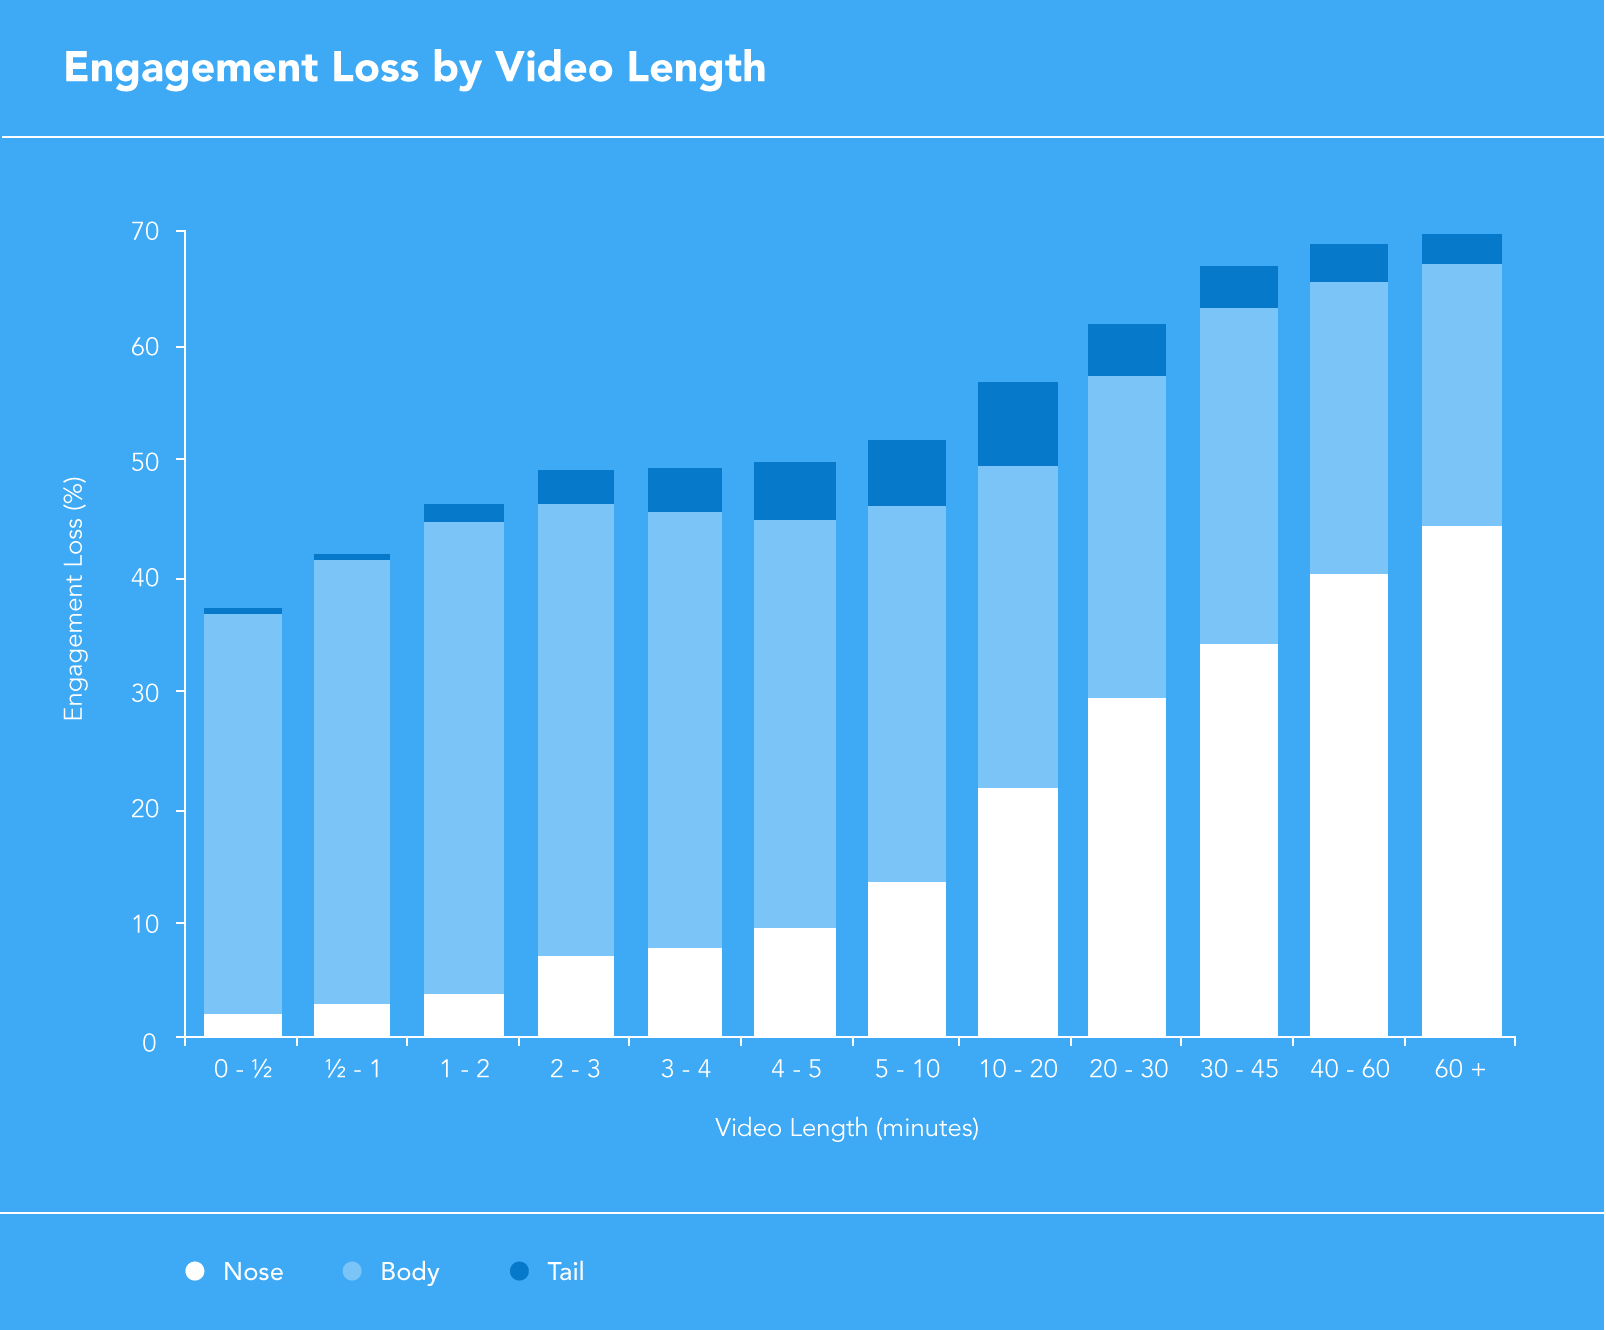
According to Google, the first 15 seconds of your video is the time period when viewers are most likely to drop-off.
So to capture your audience’s attention (and retain them), be sure to put the key message of your video at the very beginning of your script.
It can be tempting to build your story over time or write the script so that there’s a BIG revelation at the end, but often times most of your viewers won’t make it that far. Even more so, if your video is long or doesn’t communicate its purpose right away.
Here’s a breakup of audience retention for various sections of a video by Wistia:
Speak To The Audience
The point of video content is to tell a story in an engaging way, so keep it personal. Use personal pronouns, keep it relevant to your audience and show, don’t tell them their pain points.
Most importantly, keep it brief and don’t talk down to your audience. If you’re talking to a C-level executive chances are you don’t need to pander to them.
Keep it short and focus on the value you’re sharing with your viewers.
Tell A Story
Remember: You’re telling a story. So break up your script to reflect that:
- Present the problem – identify your viewer’s pain point(s)
- Introduce a solution – tell them how you can help
- Explain how it works – what is the process they need to adopt (Note: keep it high level, save the details for supporting content)
- Drive viewers to action – add a CTA, send them to your website, or have them engage with you in some manner after watching the video
A great example of animated video is an explainer video. It sums up, in high level, what your company is about and how you can help.
According to Forbes, 65% of executives have visited a vendor’s site after watching a video – Source
Create a brief

Image created in Pablo. Quote from this blog post.
It’s important to build the context of the scenario and world you are setting up for your viewer before jumping into details. Talk about the forest before the trees.
Document the points that are important for this video. Write them down and refer to it as you build out your script.
Keeping the key points handy will help you stay on track and will keep your message consistent throughout the video. It can also be useful when working in teams because everyone understands (and agrees) on the purpose of the video.
Answer the important questions
Focus on your goals, the topic at hand, and the takeaway for your viewers. Set up your script to answer these questions:
- What’s the goal?
- Who’s the audience?
- What’s your video topic? The more specific this is, the better
- What should viewers learn from watching the video?
- What action should they take? CTA, Website clicks, etc.
Use these to narrow down the scope of your script.
Find the right tone and use humor wisely
The tone of your script will drive all the other details of your animated video such as the setting, narrator, soundtrack and more. Identify the right tone for your script and make sure it supports the message you wish to communicate.
Humor can be a great asset for your video, but use it sparingly and at the right time.
Use humor to support your message, for example take the Dollar Shave Club video that went viral. It’s edgy but has just the right amount of humor.
Misplaced or poorly timed humor can be distracting so be sure to use it sparingly.
K.I.S.S. – Keep it short and simple
The audience for your video varies based on the channel and the purpose of it.
Are you creating a video for senior sales managers who should implement your SaaS platform? Or are you creating a fun Friday video to show off your company culture?
Here’s a great example of a video by Snagajob:
Identify your audience and make sure the video speaks to them. It’s also worth noting that videos tend to be shorter than most other content forms, so stick to the point and keep it simple.
You’re not going for longform, evergreen content, so use video appropriately. For example, if you have an eBook or whitepaper that you’re trying to promote, create a 60-second teaser about it.
Capture your audience’s interest with video and then leverage other content to build on it.
Start Writing
Perhaps the most crucial part of your script is writing it (duh). Use the above points as a guide to help you get started and remember, it doesn’t have to be fancy. You aren’t writing an award-winning Hollywood script.
The goal is to deliver your message in a simple and fun manner. So keep it conversational and pace yourself.
You want your audience to understand what you are saying and what you are showing them. Give them time to absorb the details and don’t overwhelm viewers with complex sentences or unnecessary details.
Tip: Separate your on-screen text from your voiceover / narration. This will help you differentiate the two when you start making your video.
Here’s a template from HubSpot that you can use to get started.
Do a table read
A handy way to finalize your script is by reading it aloud. Pick a natural, conversational pace and read the script to get a sense of what it sounds like.
This is a useful method to simplify your script and remove any complex words or sentences that may break up the flow.
You can take it a step further by doing a quick, impromptu recording on your smartphone or computer to get a sense of what it would sound like in the video.
2) Storyboarding
Now that you’ve created your script, it’s time to move on to the next step: storyboarding.
Think of a storyboard as a rough sketch of your animated video. Here you break down each scene visually and figure out the details like the character, background, animation, etc. The more detail you add now, the easier it is to animate your video.
Create blank slides. The first thing you want to do is set up a canvas of sorts for each one of yours scenes. So open up powerpoint and create blank presentation slides.
Add your script. Break up your script into logical sections and assign each one to a slide. You should now have a slide for each scene of your video.

Print it out. If you’re new to creating animated videos, I would highly recommend printing out these slides for your storyboard. Print out 4-6 slides per page so that you can see the visual flow of your video as you storyboard.
For the more advanced videomakers you can use a simple table and assign visuals on your computer itself. Here’s how I do it:

Here’s what the video looks like
Sketch your story. You don’t have to be a great artist for this step, just keep it simple.
Use basic stick figures and symbols to map out each scene. Read the script aloud and imagine what visuals would be for the scene, then sketch it out for future reference.
Here’s a template from the folks at Video Brewery that can get you started with storyboarding.
Key points to note
As you storyboard your script, make sure it’s logical and coherent. You’re creating a story so the video should visually look consistent from start to finish.
Identify a theme early on that works for your video and stick with it. For example, if you introduce a character, include him / her throughout the journey that is your story.
Here’s a good example of a character-based explainer video:
Break up the script one scene at a time and jot down these details:
- Figure out the action that is taking place
- Is there a character on screen? If so, what is the character doing?
- What is the setting or background color?
- What props are in the scene?
- What text will appear on screen? What size and color is the text?
- What are you trying to explain to your audience?
Tip: If you want to use a software program to storyboard, check out Celtx. It’s a scripting software that has a storyboarding feature and a free iPad app.
3) Creating your video
Since you have finalized your script and storyboard, this part of the process should be pretty straightforward.
There are a variety of DIY video animation platforms to choose from so rather than sharing info on how to use a specific tool, I decided to include some general best practices.
Familiarize yourself with the tool
Building out an animated video is largely determined by the the assets you have at your disposal. Most platforms have a pre-defined asset library for you to use, so poke around and see what’s possible. Ask yourself questions like:
- What themes are available?
- What props can you add to the scene?
- Are there characters? And if so, what actions can they perform?
- Can props only enter or exit a scene? Or can they do more like move, shrink, rotate, etc.?
- Can you customize a scene? This is important for branding
- If an asset is not available in the library, can you import one? What about custom logos and fonts?
Understand what the tool is capable of and then build around it.
Note: You may have to re-think some of your storyboards in case the platform you’re using doesn’t have the necessary props / assets.
Keep it visual
It may be tempting to just put up words on a screen, but remember the purpose of video is to visualize your content. As you create your video, identify scenes that can be converted into dynamic visualizations.
For example, rather than telling your viewers that your SaaS platform has great tech support, show it to them. Here’s how:

Build first, edit later
As you create your video you may be tempted to set up every little detail of the scene. Don’t.
Instead add all the elements to a scene and move on to the next one. Your video is bound to change as you build it, from small tweaks to the font to big changes like the entire storyboard itself.
Adding the high-level details saves you time in the long-run and helps you finalize the overall flow before working on the finer details.
So add all the props, characters and text to a scene. Finalize the exact details later.
Transition is key
As you build out your scenes, keep an eye on the transitions in-between scenes. If you have two scenes where a character moves from one location to another, be sure to show a logical transition between the two.
Try to keep the movement from one scene to another as fluid as possible.
4) Audio
Audio is a key component in your animated video and traditionally there are two parts to it: Recording the voiceover and adding sound effects or music.
Recording VO
Now that you’ve finalized your script and finished creating the video, it’s time to record the script itself.
There are generally two recommended best practices for recording a voiceover: hiring a professional voice actor or recording it yourself.
Hire a voice actor
The ideal option for recording a voiceover is to hand your script over to a professional.
It’s affordable and quick. On average, voice actors can turn around a recording within a day’s time and it costs around $ 100 – $ 150 for one page of script.
Tip: Most voice actors will give you a quote based on the length of your script.
There are tons of websites that can help you scout and hire voiceover talent. Here are few to help you get started (in no particular order):
But there are a couple of points to note when using the services of a professional voice actor:
Give context. The more information you can share with your voice actor the better suited he / she is to record voiceover that meets your video needs.
If your video is designed for a professional audience, be sure to include that in the brief. This could prevent the voiceover from sounding like an infomercial.
Write down everything. Want a pause after a particular sentence? Write the word “[pause]” in your script.
Italicize notes so that the voice actor knows it’s for their reference and not to be read in the voiceover. Bold anything that they should emphasize.
Pay attention to the quality of the audio. Like with any freelancer or contractor, you want to make sure that the quality of work is up to par. Listen to the voiceover with headphones on and make sure it meets your expectations.
Are there any pops or sound distortions? Is the voice actor using the right tone and is the sound consistent across the entire length of the recording? Is there any ambient noise and is the voice actor easy to understand?
The voiceover for your video literally tells the story to your audience. So make sure it’s up to par and if it isn’t, ask the voice actor to re-record it. But more importantly, be sure to share the reason why you don’t feel the recording is the right fit for your video.
Voice actors are great at working with inflections, tone, diction, speed and more. So use their technical know-how to get the right voiceover for your video.
Record the voiceover yourself
If you simply don’t have the budget for a voice actor, you can record the voiceover yourself. All it takes is a good mic, a laptop and some audio recording software.
Here’s how to record your voiceover:
Invest in the proper tech
A very crucial part of recording voiceovers yourself is to make sure you have a decent microphone (you can get one within a $ 100 price range).
A good cardioid USB microphone like the AT2020 ought to do the trick. You can also check out the Blue Yeti which is another popular option.
There’s also some variety among cardioid microphones namely between condenser and dynamic mics:
- Condenser mics sound richer but they tend to pick up more ambient noise, so you need to make sure you’re in a quiet space when using them.
- Dynamic mics on the other hand are good for sub-optimal recording conditions because they tend to filter out more of the backgrounds noise and room echo.
Another useful addition is a pop filter or pop screen. Pop filters reduce or eliminate the popping sounds that are common when recording voiceovers. They run pretty cheap, about $ 5 – $ 10 but can help ensure a high quality recording.
Lastly, when it comes to the software itself you want to record your voiceover in, you can use Audacity, GarageBand or ProTools.
I highly recommend Audacity because it’s easy-to-use, has intuitive editing features and supports multiple audio file types (also it’s FREE).
Reduce ambient noise
Before you start recording, make sure to find a quiet place with as little background noise as possible. If you’re in the office find a quiet corner and ask your colleagues to keep the noise down during the recording process.
Ambient noise can make or break your voiceover recording so be sure to pick an appropriate place to conduct your recordings.
Tip: If you can’t find a quiet place to record, book some time at a local recording studio. They come equipped with top of the line equipment and even a sound engineer.
Practice makes perfect
A good way to get your recording down is to read the script a few times before you hit “Record”. Practice reading the script from start to finish and get used to the message.
This will help you familiarize yourself with the script and reduce the potential of any slip ups when you start recording.
Record silence
Another useful practice is to record 10 seconds of silence prior to recording your voiceover.
You can use it to identify any ambient noise, fill up gaps between sentences and make the audio sound more seamless overall.
Find the right tone
Before you start recording, think over what the ideal tone is for your video. If the video is for a B2B audience make sure your script is read in a professional, yet knowledgeable tone.
You don’t want to sound like a radio jockey nor do you want to sound monotonous and uptight. Find a relaxed, conversational tone that works for your video and start recording.
Tip: If you mess up, leave a pause and keep on going. You can edit out the mistake later on.
Sit up straight, or better yet stand
A simple way to ensure a good quality recording is by positioning yourself properly in front of the microphone.
Stand up (if you have a mic stand) or sit up straight in your chair and place the microphone directly in front of you. You don’t want to be too far because it will allow in ambient noise, and not too close because you may hear some clipping sounds in the audio.
Also make sure the microphone is not near the laptop / computer because it will pick up the fan noise.
Listen to playback with headphones.
When you playback your recordings be sure to use headphones. Headphones are better than the built-in speakers on your computer and they can help isolate any problems in your audio.
Recording voiceovers can seem like an intimidating process, but the benefit is being able to do as many takes as you need for no additional costs. Here are some additional tips to keep in mind when recording your voiceover:
- Test out your setup and see what you can improve
- Keep your script handy and make sure it’s easy to read
- Don’t ad lib. Consistency across multiple takes is key, so make sure you have all the relevant points listed in your script.
For additional voiceover recording tips, check out this handy guide.
Adding Music and Sound Effects
Well placed music and sound effects can take your videos the extra mile. They can help deliver proper comedic timing, support visuals with auditory cues, and can set the tempo for your content.
For example here’s a great explainer video by eDepoze that does a great job of using sound effects:
Adding sound effects can help add to the world that you are building in your video and soundtracks can help set the tone for it. When used correctly, both of them can help you differentiate your content and bring life to your videos.
Check out this guide on how to add sound effects or music to your videos.
Putting The Finishing Touches
Now that your video is mostly completed, it’s time to go through it and finalize everything.
Clean up the audio
To make your voiceover easier to manage, break it up into multiple sections (based on the scene it’s assigned to) and add them in one by one.
This will give you more flexibility to time your scenes and breaks up your video into manageable pieces. You can use the Normalize feature in Audacity to fix the levels of your audio and make it better sounding before you add it to your video.
Make sure the voiceover matches the visuals
After you add your voiceover and music to the video, be sure to adjust the scene length and animations to match the sound.
If you want text to appear on screen with the voiceover, be sure to time it accordingly. Also adjust the scenes so that the voiceover and general flow of the video is at the appropriate speed.
You don’t want to rush your viewers through the video, nor do you want to drag it out.
Keep your brand in mind
As you finalize your video, take some time to format all your assets consistently throughout the video. Keep your brand in mind and try to make your video consistent with your brand requirements.
If you have a font that is specifically used in all content, edit the text in your video to reflect that. Add your brand logo or colors to link your content with your brand.
Background colors that are heavily saturated or very bright can distract your audience. Identify a color palette that is suitable for your video and use it consistently in multiple scenes.
Check the flow
As you put the final touches on your video, be sure to watch your video end-to-end and make changes to improve the flow of the video. Ask yourself these questions:
- Is this relevant to my viewers?
- Will they understand the story or do I have to simplify any scenes?
- Is the video on topic and does it convey the message effectively?
- Does the video flow well? Does it need to be slowed down or sped up?
- Can I visualize any more details and reduce the amount of text?
- Is the voiceover clear and is the overall tone appropriate for this video?
- Does the pace of the music / soundtrack match the rest of the video (especially the voiceover)?
Conclusion
Visual content offers a great way to communicate your story to your audience. But creating videos doesn’t have to be a challenge.
Animated videos are easy to create (now more than ever), fun to watch and can engage your viewers when done correctly. So get out there and start animating!
Do you have any other tips for fellow video makers? Have questions about anything from this guide? Leave a note in the comments section below.
(261)