Internet users of today expect that the pages they visit will be fast and smooth. They definitely notice when sites don’t run well, so performance is a feature and performance optimization is crucial. For example, pages with longer load times tend to have higher bounce rates and visitors spend less time there. Longer load times also negatively impact conversions.

So page speed is important to user experience and conversions. Another reason for speeding up websites is that in April 2010, Google indicated that site speed (and therefore page speed) is one of the signals used by Google’s search algorithm to rank pages. In short, faster sites both rank and convert better.
Some of the ways to increase your page speed and ergo, improve the performance of your site include:
- Enabling compression for your CSS, HTML and JavaScript files
- Minifying CSS, JavaScript and HTML
- Reducing redirects
- Leveraging browser caching
- Improving your server response time to be under 200ms
- Using a content delivery network (CDN)
- And optimizing images
And if you’re one of the 60 million people that have chosen WordPress to power the place on the web you call “home”, the secret behind a fast loading WordPress site (aside from good web hosting, well-coded plugins and a CDN) is using proper caching.
What Is WordPress Caching And Why Is It Important?
Each time an Internet user visits a WordPress-powered website, a number of events take place in which WordPress dynamically generates an HTML page and serves it to the user:
- The user’s browser requests a web page
- The WordPress core (or WordPress brain if you can call it that) queries the database (called MySQL database queries)
- The database returns the requested data
- The WordPress core combines the retrieved data and data from active plugins and theme to dynamically generate an HTML page
- It then serves this dynamically generated HTML page to the user’s browser
Now let’s suppose 100 people view your page. Running the same database queries again and again wastes CPU cycles and time.
Enter WordPress caching! It saves the results of previous MySQL database queries in the memory cache for re-uses. WordPress caching is one of the fastest ways to improve website performance using plugins like W3 Total Cache, WP Super Cache or Quick Cache.
WordPress Caching With W3 Total Cache
Recommended by web hosts like Media Temple, GoDaddy and HostGator and used by many popular sites including Mashable, Matt Cutt’s blog, AT&T and WPBeginners, W3 Total Cache is one of the most complete and popular WordPress performance optimization plugins designed to improve your site’s user experience and speed. It offers object and query caching, page caching, HTML, CSS and JavaScript minification, gzip compression, CDN integration and browser caching. When combined, these optimizations significantly improve the speed of your site.
So the standout features of W3 Total Cache include:
- Caching of pages and posts
- Caching of CSS and JavaScript
- Caching of feeds and search results pages
- Caching of database objects
- Minification of posts, pages and feeds including extra whitespace and comments and combining multiple CSS or JavaScript files into a single request
- Browser caching
- Mobile support
- CDN integration and support
- And WP-CLI support
The benefits of the plugin include:
- Reduced page load time
- Significant improvement in overall site performance and speed when the plugin is correctly configured
- Improved performance in the organic search results
- Improved conversion rates
- Browser rendering optimization for quick rendering of pages
- Improved web server performance
- And bandwidth savings via minification and compression
The challenge is that W3 Total Cache is a very powerful plugin. It has tons of options so you need to know how to configure it to maximize the benefits. The correct setup is not always immediately obvious, especially for first time users. In the next section we’ll walk through the best practice configuration for the, by far, most versatile WordPress caching plugin available.
Notes:
- Before you install and set up W3 Total Cache, make sure to check the performance of your site by using Google’s PageSpeed Insights and or the Pingdom Website Speed Test. This will give you an accurate before and after comparison.
- Equally important, if you’re currently using a cache plugin like WP Super Cache, you have to disable that first prior to installing W3 Total Cache or the plugin will have issues upon activation.
- W3 Total Cache uses in-memory cache to save the results of MySQL database queries. This means that you need to have a decent amount of memory reserved for your cache. If you don’t have as much memory allocated to memcached as you’d like or your server is strapped for RAM, this plugin might not be for you.
- And finally, W3 Total Cache combines awesomely well with MaxCDN.
Installing And Setting Up W3 Total Cache
To install W3 Total Cache, deactivate and uninstall any other caching plugin you may be using. You also need to make sure that the wp-content/ and wp-content/uploads/ temporarily have 777 permissions before proceeding.
To install and activate the plugin:
1. Open your WordPress dashboard.
2. Find the “Plugins” section of the navigation and select the “Add New” menu option.

3. Search for “W3 Total Cache”.

4. Click on “Install Now”.
5. Find your way to “Installed Plugins” in the “Plugins” section of the navigation and activate W3 Total Cache. This will get page caching running in basic mode.
Return the permissions of wp-content/ and wp-content/uploads/ back to 755.
To set up the plugin:
1. Click the “Settings” link to go to the “General Settings” tab. “Enable” page cache and choose “Disk: Enhanced” as the page cache method.

“Enable” minify at the auto setting.

“Enable” database cache and object cache.

“Enable” browser cache and CDN. Specify your CDN type, for example, MaxCDN.

Leave the rest of the default settings on.
2. In the advanced section on the “Page Cache” tab, check everything but “Cache 404 (not found) pages” in the General options

Under Cache Preload, check “Automatically prime the page cache” and enter your sitemap URL.

Leave the rest of the default settings on.
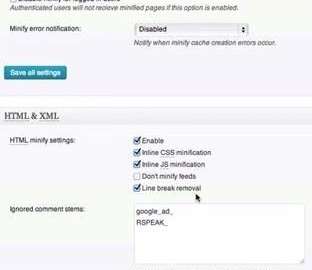
3. Next up, the “Minify” module controls whether HTML, CSS and Javascript files are compressed and minified and is something of a minefield when it comes to configuration. You need to be aware of what you turn on because some servers do not have enough memory or computing power for minification. The ideal settings for HTML & XML, JS and CSS are as follows:


Note: As a good practice, on the “Minify” tab, set “Minify error notification” to “Admin Notification” so you are notified when minify cache creation errors occur.

4. Moving on, the “Database Cache”, “Object Cache” and “Browser Cache” settings don’t do as much as page cache and minification but it’s good to turn them on.
On the “Database Cache” and “Object Cache” tabs, all of the recommended settings are preset. On the “Browser Cache” tab, under General, check everything but “Prevent caching of objects after settings change” and “Do not process 404 errors for static objects with WordPress”. When you save the settings, all the settings below will automatically take care of themselves.
5. CDN, as we mentioned above, stands for Content Delivery Network. If you have a CDN provider, proceed to the “Content Delivery Network” tab to populate the fields and set your preferences. You need to 1) decide which types of content you will be offloading to the CDN in the General options and 2) establish the connection with the CDN itself via the Configuration panel.
6. And finally, utilize the “User Agent Groups” tab to specify any user agents, for example mobile phones, if a mobile theme is used.
Troubleshooting W3 Total Cache
Sometimes, after installing W3 Total Cache, you may find (to your dismay) that your site’s speed has decreased. The most probable reason for this is that you conducted the website benchmark while preloading the cache. The solution: Wait for an hour and try again.
Another common reason for this is if you select the wrong caching methods. WordPress caching with W3 Total Cache sometimes involves a certain amount of A/B testing to squeeze the best results possible.
Last but not least, if your site is still having problems, it might be a conflict between W3 Total Cache and another plugin or your theme. Submit a bug report by clicking on the “Performance” tab, and then clicking “Support” to submit a request for free support and troubleshooting. Deactivate W3 Total Cache temporarily until your support request is handled.
Now Read:
- Top 20 Free WordPress Plugins for Bloggers
- Crazy Handy WordPress Plugins you Haven’t Heard of (yet)
- 5 Best SEO Plugins for WordPress
Next Steps:
- Top 20 Free WordPress Plugins for Bloggers
- Crazy Handy WordPress Plugins you Haven’t Heard of (yet)
- 5 Best SEO Plugins for WordPress
Hand-Picked Related Articles:
- Top 20 Free WordPress Plugins for Bloggers
- Crazy Handy WordPress Plugins you Haven’t Heard of (yet)
- 5 Best SEO Plugins for WordPress
* Lead image adapted from ·JERRYANG
A Complete Guide To Using W3 Total Cache
The post A Complete Guide To Using W3 Total Cache appeared first on Search Engine People Blog.
(119)