The Keyword Planner can be super useful when using it for your business. Whether you’re running an AdWords campaign or doing some research for SEO, it’s good to jump in and poke around. Being a PPC ninja (much cooler than a regular ninja), I like tips and tricks to help make my life easier when using the tool. Below I’ll explain three tricks I use often.
Filter Your Keywords
This is a great one and so simple to use. Let’s say you are a plumber and you want to do some research on plumber type keywords. But you only want to see the ones that include “emergency” in the phrase. You’ll want to do this:
- Type “plumber” in the top field of the tool.

- Then click on the pencil next to the Keywords to include box.

- Enter “emergency’ and click Save.

Now you’ll only see keywords listed with emergency in the phrase.

How cool is that?! It’s actually very useful when you are doing research for specific parts of your business. Maybe you sell an online GPS app and only want to research keywords for when people are searching for iPhone GPS apps. You would simply add iPhone to the include box. By filtering specific keywords like “iphone” or “android” or “free app” you’ll keep your keyword research very tight. And the biggest keyword mistake I see is that businesses have 2-3 ad groups with all types of keywords included. Tighter ad groups lower your CPC and increases your CTR.
Extra Tip: Another type of filter I like to use in the planner is the negative keywords filter. If your keyword is “GPS app” and you are seeing a lot of keyword suggestions for “free gps app,” then you might want to filter out the keyword “free.” To do this, click on the pencil next to the negative keywords title and pop in “free.” This will filter out all those free suggested keywords.
One more tip! I’m often guilty of forgetting that I have a word in either filter. When you’re done using either filter, remember to jump back into that filter box and delete the word.
Use Your Competitor’s URL
This is sneaky but simple to do. Check out some of your top competitors’ websites on Google. To do this, type in a keyword you think your customer would search for. If we roll with the plumber example, you might type in “local plumber.”
Look at the organic listings and grab three to five of the URLs that are listed there. Copy them over to a notepad file.
Now jump over to the keyword planner and click on Modify Search at the top of the page. If you have a keyword in the top box, clear it out. Then copy your competitor’s URL into the landing page field. Click on Get Ideas and then click on Keyword Ideas.

Google will crawl your competitor’s site and look at keywords that relate to their site. I use this technique to get a lot of good keyword ideas when running a campaign for my clients. I like to sort by the keyword (by relevance) column. I usually find the best keywords listed towards the top when sorting by relevance.
Disclaimer: This doesn’t actually affect your competitor’s website. If you are trying to sabotage them, then this will do nothing. All Google is doing is crawling their website.
Calculate Your Bid Price
This one is a little more involved but still pretty easy to do. I like to research different prices I’m going to pay for a keyword at different positions. Let’s say you want to sit right at the top of the search page for the term “Austin plumber.” You can add it to your plan and then play around with the position. Sounds confusing, so let’s jump in and just do it!
- In the keyword planner, enter your search term into the Your Product or Service field. For this example, I’m going to go with “Austin plumber.”

- Click the arrow under the Add to Plan column and you’ll see it added to the right column. Now you can add a bunch of keywords here, but I’m going to just add this one for now.

- Click on Review Plan.

- You’ll see a nice big graph on this page. First you want to click on the three dots and expand the graph range.
 Now here is where the magic happens!
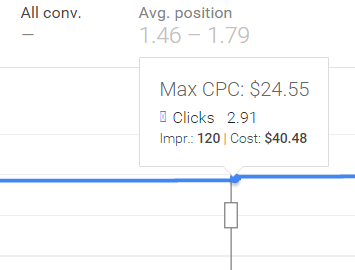
- Click on the graph and move up the marker. You want to shoot for a position of 1.5 if you’re looking to see what the cost is for that top position.

- If you hover over the graph, you’ll see the max CPC you can expect to pay. Don’t freak if it’s super high! A lot of times you won’t pay this price but it is possible that you might.

If I’m shooting for that top spot in Google, I’ll enter this max CPC for that particular keyword. Or like I mentioned, you can add a bunch of keywords and see what the average max CPC is and set the ad group at that bid amount.
And there you have it! The Keyword Planner can really help your Adwords campaign by letting you see what people are searching for and checking your bid prices.
If you have any questions, comment below and I’ll try to help you out!
Digital & Social Articles on Business 2 Community(101)