WordPress is one of the most popular CMS’s (Content Management Systems) that is specifically designed to help both developers and beginners create websites and blogs using an agile development. If you are a beginner and want to know how to install WordPress to create your website, there are two ways to do this.
- Installing WordPress using Softaculous
- Installing WordPress manually (click here to skip to this step)
Softaculous is an installation application that makes it extremely easy to install and configure WordPress within minutes and start working on the website. It’s something that a lot of hosting providers include within cPanel when you sign up to them for an account. It’s generally available on shared hosting accounts as standard. However, in some cases, (especially with VPS Servers) if your hosting service does not provide 1-click solutions you might have to use the manual installation process to install and configure WordPress. Let’s discuss both methods in detail.
How to Install WordPress Using Softaculous
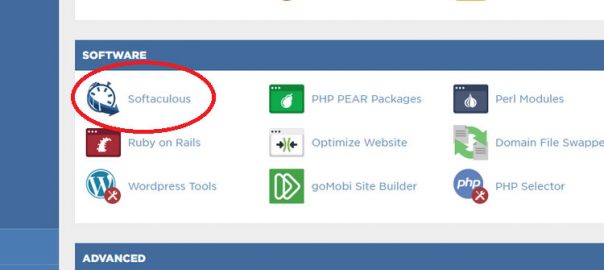
1. Locate Softaculous in cPanel
In order to install WordPress with Softaculous, log into your cPanel using your credentials. Find the “Softaculous” icon. You might be able to find it in the “Software” section.

Based on your hosting service, the interface could be a little different but the process is exactly the same. Click on the “Softaculous” icon. You will then navigate to the next page where you will see different CMS and software options offered by Softaculous; for example WordPress, Drupal, Joomla and others. Click on the “WordPress” icon.
2. Select WordPress Within Site Builder & CMS

The WordPress installation wizard will ask you to choose the domain name and directory where you want to install WordPress. If you have multiple domains attached with the same hosting plan then you will get a dropdown menu to select the relevant domain name. From that menu, select the chosen domain name.

3. Use the directory to correctly map your site.
If you leave the “Directory” field blank, WordPress will be installed on the root of your domain name i.e. www.YourDomain.com. However, if you want to install it in a specific directory like www.YourDomain.com/blog then you have to enter the directory. If you are installing WordPress on the main domain then leave directory field blank and click on the next button.
4. Finish The Installation
On the next screen, you will have to enter some details about the WordPress installation. Enter the
- website name
- user name
- password
- your email address
The user name and password will be used later to login to your WordPress Dashboard. The email address should be used for password recovery and notifications; however you can change/modify this information from WordPress settings after installing it.

Once you have entered these details, tick “I agree with Terms and Conditions” and click on “Install” button. The installation wizard will take a few seconds to complete the process. WordPress will automatically create a new database for the new WordPress installation during this process.
This is another advantage of using Softaculous as the manual installation requires to create database yourself which can take some time. When the WordPress Installation process is completed, you will get a welcome message saying “Wordpress has been installed successfully”. After that you can navigate to your website login panel by using the URL www.YourDomain.com/wp-admin (with YourDomain.com being your own website address) and go to the WordPress Dashboard.
Login with the username and password you created, and start customising your site.
How To Install WordPress Manually
Although most popular hosting companies offer a 1-click installation for WordPress via Softaculous, you can also install it manually if needed. Installing WordPress manually involves six steps.
- Download WordPress from its official source
- Upload WordPress files to your server
- Create a database and user
- Configure the database
- Run the installation script
- Completing the installation process
Let’s discuss these steps in details.
1. Download WordPress from its Official Source
In order to start the manual WordPress installation process, first you need WordPress files which you can download for free from their official website www.wordpress.org/download. These files would be in zip format.
2. Upload WordPress Files to Your Server
Now you have to upload that zip file to your server. There are 2 ways you can do this.
- Using an FTP application (recommended)
- Using File Manager through cPanel
If you are using File Manager in cPanel, extract the file on your computer locally first and then upload all of them onto your server. Make sure you upload those files in the relevant folder of your domain name.

3. Create A Database and User
Go to MySQL Database Wizard in your cPanel.

The actual process could be a little different depending on the hosting company you are using but the basics are the same. To create a new database:
- enter the database name
- create a new user by providing the user name and password
- add that user to the database
- make sure to click on “All Privileges”
Now you have created a new database for your WordPress site successfully.
4. Configure The Database
Although you have created the database, it is not associated with the WordPress files. You have to enter the relevant details in a specific file. To do this:
- go to the File Manager in your cPanel
- among the WordPress files, find “wp-config-sample.php”
- Rename this file to “wp-config.php”

Select it and click on edit. From there you can read the contents of this file. Wp-config.php contains your database login information. You need to replace some of the information to configure the database to work with the WordPress. To do this, you need to:
- add your database name
- user name
- user password

After making these changes, simply click on ‘save’ and close the file.
5. Run The Installation Script
Now you have to run the installation script so it can set everything in order. In order to do that, simply open a web browser on your computer and go to this URL
www.YourDomain.com/wp-admin/install.php
Replace YourDomain.com with the actual domain name where you are installing WordPress.
When finished, it will show a welcome screen and will require some information from you.
6. Complete the Installation Process
In order to complete the final steps, you have to enter some information. This information is exactly like I discussed in the Softaculous case above.
- Site name
- Username for login
- Password
- Email address where WordPress will send you the login information
Click on the “Install Now” button and the process will take a few seconds. After that you will see “WordPress has been installed”. By using the login information sent to you in the email, you can login to WordPress Dashboard and start designing your newly installed website.
Digital & Social Articles on Business 2 Community(77)