— August 25, 2017
Facebook is the leader in social media live streaming. You’ll want to join in if you’re trying to attract a larger audience and engage your existing fan base.
Did you hit a roadblock when trying to get started?
This week’s FAQs article will give you a basic overview of the logistical steps you’ll need to take to create a live video in Facebook’s desktop and mobile platforms.
— — —
Creating a Facebook Live Video on Your Computer
For a while there, you could only create live videos on mobile devices, not your computer. Thankfully, that has changed, and you’re now able to record from your desktop or laptop computer. This is especially helpful when you’re recording a virtual interview or trying to record something without a distracting background.
Now for the instructions…
Finding the Live Video Option
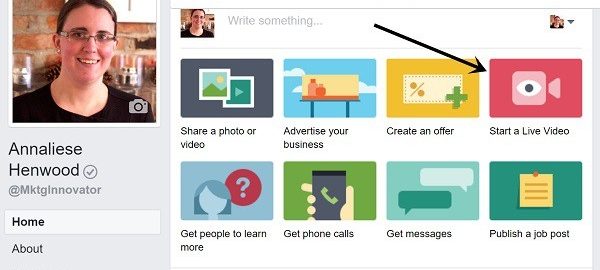
Although it depends on what page type you’re working with, you should be able to find the “Start a Live Video” option from the menu at the top of your page. You’ll see a collection of actions Facebook recommends for you, and it’ll be ordered differently for each page type. However, you’re likely to see the option shown prominently in this menu no matter what your page type is.

Allowing All the Permissions
When this is your first time recording a live Facebook video, you’ll need to grant permission for the site to access your webcam and microphone. If you’re using Chrome as your browser, you’ll see a popup appear on the top left of your browser, and you’ll need to select “Allow” to give proceed.
Getting Everything Set Up
Once you’ve granted the necessary permissions, a video preview will appear. You’ll want to do a few quick things to make sure everything is set up as it should be, including:
- Write a clear, descriptive message that explains what your video will be about. Most importantly, keep the description focused on the “what’s in it for me” approach where you give viewers a reason to watch.
- Make sure you’re sharing from the right source. Facebook allows you to choose from a variety of sources, not just your page, so make sure you have your page selected. If you are an admin for multiple pages, it’s even more critical that you check the source before proceeding.
- Check and double check your camera and microphone. Look at your video preview and confirm that it’s how it should be. Test your audio both from the preview and an external source, if available. If you’re using a headset, make sure you don’t have it muted. You’d be surprised how often this mistake is made.
Go live when you’re ready.
Best Practices for Desktop Live Video
Check your lighting and test your sound before going live. If you wait, you’ll have a rush to fix the issue, and you’ll have an audience watching you while you do. When it comes to your video’s sound quality, you don’t want to simply accept the bare minimum. Make sure your audience can not only hear you but also understand every word.
Check the video background to take away distracting objects. You might be recording from your office or home, so there are bound to be objects and movement from behind you. Yes, it’s okay to have plants or simple decorative objects behind you, but you certainly want to avoid anything or anyone that moves. When there’s unintentional movement in a video, it draws attention away from you and toward that moving object. Confirm that the only movement in your video comes from you.
Make sure your internet service is strong enough. When you’re recording from a computer, you have two options: wifi or ethernet cable. Wifi is the most common option, but it’s also the most unreliable of the two. If you’re going to depend on wifi, only do so when you know it’s strong and reliable. Your audience will not have the patience for skipping or cut-outs in your live video. It throws professionalism right out the window.
Make sure your computer can handle the power consumption. Your computer is going to need the ability to allow video recording without overheating or crashing. You’ll know if there’s a risk of this when you test video recording. If you hear your computer starting to buzz louder and louder, it’s likely to freeze up from overuse. To record your live video, you’ll need a strong enough computer that will allow the recording to continue all the way through.
Creating a Facebook Live Video on Your Phone
This is the most common platform for recording live video on Facebook because you can record from anywhere with a strong enough signal. It’s important to follow the right steps to record a high-quality video, especially if this is your first time.
Finding the Live Video Option
Unlike the web version from above, you won’t have a standalone option for live video. Instead, you have two ways to find it:
- Select “Publish” from your main page feed. You’ll be directed to a new screen where you can share any type of post, but you’ll also see the option for a live video.
- Further down in your page feed, you’ll see the standard block with the text “Write something…” in it. When you press in that space, you’re directed to the same page as if you selected “Publish.”

Allowing All the Permissions
Facebook will need certain permissions from your phone, such as accessing your camera and microphone. You won’t be able to proceed until you accept the request.

Getting Everything Set Up
There are a few things you need to check and confirm before you start your live recording. If you skip this step, you risk producing a low-value, unreliable video that’ll only hurt your brand reputation. This is why it’s so essential to:
- Adjust the lighting and special effects options available to you through the preview screen.
- Add a description that clearly tells your audience what your video will be about and why they should watch.
- Use the “donate” button if you’re a nonprofit or are recording a campaign on behalf of one. Check to make sure the donate link works and leads to the right place!
Go live when you’re ready.
Best Practices for Mobile Live Video
- Use wifi or 4G signal to have a reliable signal for your video and to prevent disruptions.
- Record somewhere that has less background noise, or invest in equipment that keeps your voice the primary sound.
- Invest in a stand to prevent a wobbly experience for your viewers (or use a selfie stick).
- Turn off notifications on your phone to prevent interruptions.
- Test everything (sound and lighting) before going live. You may need to use a different program, or create a live feed for your private profile as a test. Maybe ask your friends for input on your video description and quality.
— — —
That’s it for this week’s FAQ. You can leave a comment here with any questions you’d like included in this series. Let me know if you have any burning questions about social media, blogging, SEO, email marketing, or any other marketing subject. Your question might be featured!
Digital & Social Articles on Business 2 Community
(122)