
I felt famous. And I’m not gonna lie, it felt fucking fantastic.
My post – my nerdy little ode to planners and notebooks – had gone viral.
(I know…I hate that word. It sounds like your blog post needs an antibiotic or something. But stay with me here.)
Over 1,000 shares in less than 2 weeks:

On my itty, bitty, 6-month-old blog. Hollaaaaa.
I looked back at the numbers:
- A 235% increase in users.
- A 535% increase in social referrals.
- A 77% increase in conversion rate (turning readers into subscribers).
So yeah, I feel kinda famous. But am I surprised? No.
Because truth time? I was sitting and waiting for this to happen.
I planned it from the start.
Mwa ha ha.
(Pre-S: This post contains affiliate links because as you’ll learn in this post, I like to make the most of my blog’s traffic!  But it’s cool, I really do love these products and wouldn’t include these public displays of affection otherwise ;).)
The Background: Pinterest + Planning the Post
It’s not like this was some overnight success, or even a fluke. This post was months in the making. I don’t take my planners lightly!
And one specific network was always somewhere in mah brain.
I started taking photos and notes for this post in October 2015, when the first 2016 planners started going on sale and I started thinking about what my organization setup would be.
Also in October 2015, I started using Pinterest again after a pretty long break. I was looking at Pinfinite Growth and getting serious about optimizing my blog for the site.
Before I even started writing, I knew that it would be a monster post. I’d written about my organization tools in 2015, and that one was always pretty popular.
More than that, it was always popular on Pinterest, despite me not thinking about the network one bit when creating it. In fact, it was mostly optimized for Twitter back then. No pinnable images, just a Twitter-optimized graphic and some photos.
Yet, the subject matter and audience (organization and bloggers/entrepreneurs) was on target enough that people were still pinning it. That had me thinking: what would be the Pinterest community’s reaction to a post like this that was optimized for them?
So as I continued to plan the post, the goal was always to make it a Pinteresty post.
Here’s what I did to make that happen.
Want to make sure your posts are prepped for success? Download my free checklist to get your posts ready to attract and convert crazy traffic.
How I Designed a Blog Post for Viral Pinterest Success
1. Wrote a Great Post

I try to avoid “write quality content” as blogging advice, because that’s like giving driving directions by saying “get in your car and drive there.” It’s so vague, you can’t really do anything with it.
But it’s worth noting that if my writing sucked, the post was disorganized, or the topic wasn’t relevant to my audience, this success wouldn’t have happened. The optimized images and catchy headline wouldn’t have mattered.
People might have still clicked through from the pin, but the visitors wouldn’t have been impressed enough to convert afterwards.
So don’t think of writing great blog posts as a blogging tip, but as a prerequisite for any of the other tips to work.
Now let’s talk about what I actually did with this post:
- Started with a strong opening: The first paragraph grabs the reader’s interest. The second one establishes the audience. Then I start listing a bunch of the audience’s problems and frustrations before going, “and here’s how you can fix all that! yay!”
- Wrote casually: With monster posts that are thousands of words, people can get bored. It’s not enough to write smart stuff, you have to be entertaining and engaging at the same time. The post is set up to sound more like a conversation with a close friend than a dry lecture about business productivity.
- Stayed concise: I’m a huge stickler for wordiness. Ask the writers I edit and work with: they’ll tell you I can be ruthless and cruel to carefully worded paragraphs – especially my own. Twenty-five hundred words may not seem concise, but it’s packed with information, not fluff. The first draft was actually closer to 4,000 words. I cut a lot out.
2. Took Original Photography
One thing that surprises me about this post’s virality is that a lot of the pins aren’t even of the designated “pinnable image.” There were also a lot of people pinning the actual photos of my planners and notebooks.
I don’t take a lot of original photography – there’s literally zero natural light (one window looks out over an air shaft, the other a fire escape), and in 400 sq. ft., there’s not much uncluttered space to set up a photo shoot. Aaah, the luxuries of New York City.
But it’s kind of hard to talk about what I write down without showing you what I write down.
So once a year, when I’ve done these posts, I’ve basically rearranged the entire apartment, moved every light source post, stood on a chair, recruited my boyfriend to hold it steady because my ankles refuse to do their jobs ever, and took some pics. Aaaaand then edited them.

Way more effort than I usually go to with the visuals for my blog, which are mostly made from stock photos and icons.
And there are 2 things about these photos that I think makes Pinterest users love them:
- They are very, very colorful: that’s how I like my stationery!

- They show context: they’re not pictures of blank notebooks and planners, like in stock photos. They show my actual editorial calendar setup, my weekly t0-do list layout, etc. So they’re as educational as they are visually appealing.
(Bonus perk: I now use them instead of stock photos in graphics for other posts!)
I also used one of the original photos for the post’s designated Pinterest image, which was shared hundreds and hundreds of times. And it’s one of my favorite images on this entire site. Idk why, I just love it.
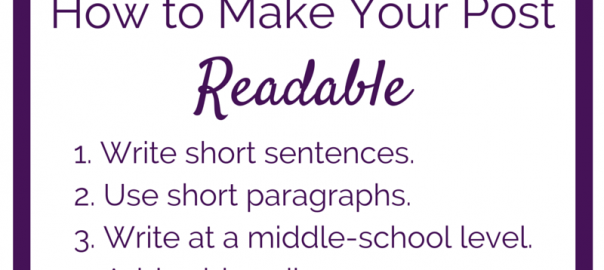
3. Made the Post Super Readable

I’m a geek about readability.
It’s one of those other things the writers I work with could rant about for a while. 
But with a 2,500-word post, I really needed to make things easy for readers.
That means writing content that’s skimmable and easy to digest. You don’t want squinty readers.
To prevent le squints:
- Write in short sentences to create natural pauses for your reader.
- Use short paragraphs for the same reason, plus the added benefit of separating thoughts more logically and adding whitespace. (I usually try for 4 lines or less.)
- Write at a middle school level. Yes, your readers can read at a higher level, but why make them? The whole point of this is to make things easy.
- Use subheadings (using h2, h3, etc. tags) to add structure to your posts, separate and summarize separate sections, and create a clear hierarchy for the information.
- Add formatting like bolding and italics to make your most important points stand out to people skimming through.
4. Included a content upgrade.
A lot of bloggers tell you to add content upgrades to popular posts. I don’t wait for them to become popular.
If you wait for a blog post to get popular to add an upgrade, you miss out on so many conversion opportunities from the post’s first readers – the ones that made it popular.
Since I relaunched and rebranded this site last fall, I’ve included content upgrades from the start in about two-thirds of my posts. Whenever I can think of something good enough to download myself, I’d add it in.
So I had an upgrade in there, and that’s the sole reason this post was worth it. Take a look at my conversion rates in Q1:

Wouldn’t it suck to have a blog post go viral and it have absolutely no long-term benefit on your blog or business?
I’m not about to let that happen to me. I want to make the most of my traffic, so I put those suckers in whenever I can (without it feeling gratuitous). And include calls-to-action for them several times within longer posts like this one.
5. Added extra, customized opt-ins

I’m normally not too heavy on the opt-in forms. I have them in the usual spots in my theme, and the content upgrade callouts within my post. But no slide-ins or pop-ups or anything.
At least, most of the time.
However, when a post is getting a lot of traffic, I’ll amp it up a little bit. So I temporarily added a few more opt-ins forms to that post only.
The main tool I use for all the opt-ins on my site, OptinMonster, has amazing targeting and customization options. So I could do this without being too annoying and turning readers away instead of drawing them further in.
Here’s what I did:
- Changed the banner at the top of the page to promote the content upgrade instead of my more general lead magnet
- Customized the sidebar opt-in to promote the post’s specific content upgrade as well.
- Added a pop-up that only triggered once the reader scrolled 85% of the way down the page. With the comments on the page, that ends up being around when they finish reading. So there was already a regular opt-in there, but this one would be more noticeable. And it didn’t interrupt or distract the reader from the post, since they already finished it! (PSA: this is how you make non-annoying pop-ups.)
- Added one more inline CTA for the upgrade in the body of the post.
This is how I increased my conversion rate by 77% and almost doubled my list in the two or so weeks my post was getting this crazy traffic. Boom.
6. Got personal
Yeah, this was an education post, but it was also super personal and behind-the-scenes. Hell, some of the photos even show you the topics of my future blog posts and weekly emails!
It lets readers learn from example, gives more context, proves that I know my shit about the topic, and shows how my whole system really works.
Getting personal with your readers helps build a long-term connection, too. You don’t need to let it all hang out all the time, but don’t be afraid to open up.
7. Included multiple content upgrade calls-to-action
Lastly, I didn’t just mention the post’s content upgrade once.
I mentioned that I added a few more opt-ins than normal once the post started getting popular, but I always include more than one “bright box” (my technical name for the ones on my site ) in a blog post.

My theory on opt-in forms is that they shouldn’t be everywhere and in your face, but a reader shouldn’t have to scroll too much or look too hard to find one.
In long posts with lots of photos, that means more than one at the top and one at the bottom. And when the post was getting tons of traffic, I added an extra in there, as I mentioned earlier.
And that was in addition to the post-specific CTAs that replaced the normal banner and sidebar forms.
No wonder my list almost doubled.
If you use a list building tool that lets you change which form/CTA is shown based on its category/tag/slug, TAKE ADVANTAGE OF IT.
Want to make sure your posts are prepped for success? Download my free checklist to get your posts ready to attract and convert crazy traffic.
What I Could’ve Done Better
Now, this might be one of my biggest wins for this blog. But that doesn’t mean I did everything perfectly.
Here’s what I would have done differently, or might change for next year:
1. Published Earlier
I know the timing wasn’t perfect for this one. While the content itself is evergreen, the headline and graphic would have been much more relevant a few months earlier.
I published a post about planning for 2016 in late January. Most people have already figured out how they’re going to plan the year by then.
Given that I had already bought all the materials and started experimenting by late 2015, I definitely could have published earlier. Maybe then it wouldn’t have taken 2 months for the post to reach its peak?
I definitely want to publish the 2017 edition in November or early December.
2. Internal Linking
The one metric I wasn’t happy with from this boost was pages per session. It actually decreased a bit, meaning the new visitors to the planner post didn’t always stick around.
Looking back, there were a lot of places I could have linked to other posts and engaged these new visitors more. Links to other posts about my to-do lists and organization, for example. I tend to gush about it pretty frequently.
I’ve added a few links since then, but wish I’d done it sooner. Internal links are something I’m trying to focus on more in general, too.
Want to Avoid My Mistakes?
If you want to make sure your post is prepared for the start – so it can attract and convert viral traffic – download my free checklist!
How do you make sure your posts are ready for thousands of hits?
Digital & Social Articles on Business 2 Community(136)