To paraphrase Mugatu, “Pinterest. So hot right now.” (That’s right, Hansel’s been bumped out of the spotlight!)
As I’m becoming more involved in the whole blog-to-biz niche, I’ve seen a passion for Pinterest that I hadn’t felt or seen in years. It inspired me, and I logged back into my account for the first time in over a year. I started pinning again. And since it was around the time I also started blogging again, I knew I wanted to figure out how to make my blogs more Pinterest-friendly.
But the more I read about Pinterest-optimized blog graphics and see them “in the wild,” I couldn’t let go of one thing.
Pinterest-friendly blog graphics are ginormo.
It’s for good reason, I won’t contest that. But really, they’re so big! And so big can be so annoying – you know when you’re going away for a while and need one of those huge suitcases? And no matter how smoothly the wheels roll, you can’t get it to go where you need it to, just because how do you control something of that size?
Exactly. It can be kind of hard to manage them. The same goes with pinnable images sometimes.
Even if you only have one pinworthy graphic per post, where do you put it?
You can make it the post’s header image, but then forget about above-the-fold content. And I know, that’s not as big of a deal anymore, but it does still matter.
You can put it in the middle of the post, but then there’s a huge, scrolly gap between two paragraphs. When a blog post is meant to transition smoothly from one section to the next, that can make things awkward and break up the flow. And awkward silence, if you will.
Plus, what looks good on Pinterest may not look awesome with your blog’s design, even if they have consistent branding. I mean, they’re different mediums; it makes sense.
And forget about customized graphics throughout the post.
I love the idea of creating a customized social graphic for every subheading or main point of a post. It lets your readers not just pin your post, but pin their favorite part. Such a personalized experience. 🙂 But if you do that more than once or twice in a post with Pinterest graphics, you’re buying your post a one-way ticket to scroll city.
So, I’ve been playing with other ways to make my blogs more pinnable, without having to give up the look I prefer for my posts. After lots of sleuthing and testing, I found a method I love: the Super Secret Pinnable Image.
The Super Secret Pinnable Image
It’s super easy. It’s super effective. It’s super sneaky. It’s the super secret pinnable image!
All you’re doing is adding a Pinterest-optimized graphic to your post, but then resizing it down until it’s a little speck that Horton the Elephant would get too emotionally attached to.
My sneaky little images are 1 pixel by 1 pixel. Can you find it in the post?
How to Add Your Own Super Secret Image
In WordPress, just insert the image wherever you want to hide it. Then, hover over the image until the actions menu pops up, and click the edit button. Then fill out the title as you normally would, select “Custom Size” from the size drop-down menu, and resize the width and height.

It takes about 5 seconds, start to finish. 🙂 Quick enough that I didn’t even make a how-to gif, and you know how I love those!
Ways to Rock Super Secret Pinnable Images
As you can see, it’s stupidly simple to do this trick once you know about it. A perfect example of #TheMoreYouKnow! Haha 🙂
Since it’s so easy, why not use it to the max? Here are a few ways you can use hidden graphics:
- Create a main pin: This is for those of us that don’t like what a pinnable image does to our blog post’s look. We’re stereotypical like that. Just resize it down and let your ‘Pin it’ button introduce your readers to the image when the time is right.
- Create customized pins: You can also create custom images for each subheading or section of your post. For example, in this post, I could (and plan to) make one for the intro section, the tutorial, this “ways to rock it” part, and the #ProTip coming up next. This way, readers can pin the specific parts they find most useful.
- Create designated content upgrade pins: When I see bloggers promote content upgrades on Pinterest, it’s usually on the main blog post image. The pin is mostly about the post title or whatever, with a note about the upgrade somewhere. Here you can make it its own pin without taking up more page space.
- Add more pins: If you workshop multiple headlines while writing your post, now’s your chance to put them to use and do some A/B testing along the way. Create hidden images for each of them. You can compare which one gets pinned and clicked the most and change the headline to match, if it doesn’t already.
#ProTip: Include a “Pin this post” CTA
Worried that people won’t know you want them to pin your post, when there’s no visible image begging for it? There’s an easy fix for that, too. Try this!
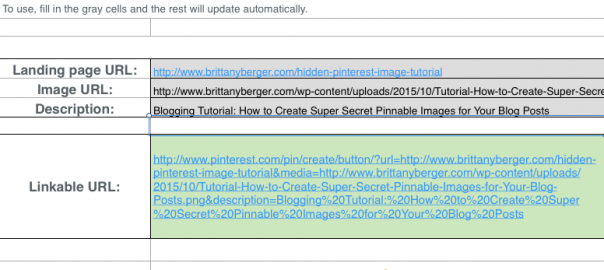
Yup, you can create a customized “Pin it” link to go with your hidden image! Just download this Pin It URL Generator from Ripen Ecommerce. The free spreadsheet is pretty self-explanatory: just fill out the URL for the image, the URL it should link to, and the pin’s description. The formula will then plug what’s in those cells into the resulting URL!

From that, you can include a customized Pin It graphic or text CTA, instead of a giant image.
Again, something crazy useful that takes just a few seconds once you know it exists. Those are my favorite kinds of discoveries by far!
Get to Pinning
This little trick is a simple, 5-second way to make your blog better without sacrificing Pinterest traffic. It also opens up opportunities to make your posts even more pinnable. And can act as a mechanism for headline testing along the way.
Talk about low-hanging fruit. That’s why this is my new favorite optimization tactic!
Digital & Social Articles on Business 2 Community(138)