Convert Browsers To Shoppers
Many retailers are reluctant to automate browse recovery emails because they aren’t certain that automated browse recovery emails will really get shoppers to come back and buy from your website. Yet, Brands that use the Bronto Browse Recovery feature are seeing impressive results, with conversion rates of up to 20% and return on investment (ROI) ranging from 10x to 60x,
Here’s the four-step game plan, by Oracle/ Bronto Copyright © 2018, based on customers who have been the most successful in applying a browse recovery strategy for more than 95% of visitors who leave the website without making a purchase.
Step 1 TRACK EVENT DATA
Without successfully tracking all product views, you’ll never send all of the emails you should send, which will keep you from seeing the best possible ROI, says the report. Most retailers stop here. They worry that tracking browse activity, and sending messages to shoppers after a browse session will be invasive. But that perception doesn’t match reality.
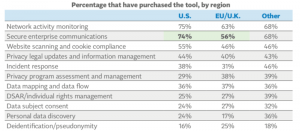
In fact, Oracle Retail 2025 revealed that 56% of consumers now recognize that sharing personal information can improve their shopping experience, and in Winning in the Age of Personalization, a study by Mindtree, 76% of consumers say they believe personalized promotions would encourage them to purchase relevant products they’ve never purchased before
Step 2 SET UP TRIGGER MESSAGES
With browse data now flowing in, it’s time to examine configuration. Don’t think about browse recovery as individual email sends, but rather as a campaign to move your visitors through the buying lifecycle.
When configuring your triggers, be sure to consider the following:
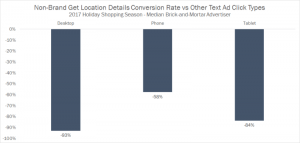
- According to Deloitte, 76% of shoppers, who conduct a local search from their smartphone, visit a business within 24 hours, and 28% of those searches result in a purchase.
- Allow different rules to send frequently to ensure visitors moving through the buying lifecycle receive the entire campaign of messages.
Step 3 DESIGN YOUR EMAILS
Even with perfectly timed sends, a poorly designed message can negatively affect your results.
Use personalized, relevant content. Make sure the visitor knows why they are receiving the message and that it isn’t just another basic marketing message. Remember: You are tracking their browsing history. Use that data to improve their experience with your brand.
- Remind shoppers what they were browsing. Display product images, user reviews, and other related content. And give them a clear call to action, such as a button or links to return to those products.
Step 4 OBSERVE AND OPTIMIZE
You’re (now) tracking data and sending out meaningful messages to shoppers. But don’t stop there: It’s time to keep an eye on your work and consider optimizations based on your results.
As you review your campaign, consider these questions: Are your metrics for a particular rule significantly lower than others?
- Your settings may be overlapping with the settings for another rule, or the settings for allowing another message to send. could be too restrictive. Consider adjusting them to identify visitors earlier in the buying lifecycle and send additional emails as the visitor becomes more engaged.
- • Lastly, are your loss rates higher than normal? You could be sending too frequently or your emails may be leaving contacts with a bad impression. Think about using the same rule less frequently and altering message content to provide more value to visitors in their shopping journeys.
(58)