You’ve installed WooCommerce on your ecommerce site. Congrats! Now, it’s time to customize your store…but you have no clue how to do that. Well, there’s an easy and effective way you can tweak your online store without any hassle: WooCommerce hooks.
By using WooCommerce hooks, you don’t have to worry about juggling multiple plugins to customize your store or add new features to it. But before we jump in on how to use this amazing functionality, what exactly are WooCommerce hooks?
What are WooCommerce hooks?
WooCommerce hooks are functions that allow you to insert, modify, or change data and features in specific locations on your store. With WooCommerce hooks, you can easily tweak how your store looks and add new features using custom code.
For context, hooks are like sockets in WooCommerce, where you can plug in your own custom code. Instead of writing custom code from scratch, WooCommerce provides a long list of hooks that you can copy to create custom looks and functionalities. You can add colors and custom checkout and cart pages to your WooCommerce store. Not only that, but you can also remove or modify functions that you don’t like.
Say you want to make a specific change to the shopping cart that notifies prospective customers that they haven’t selected any items yet. All you need to do is add in this custom code: woocommerce_cart_is_empty

WooCommerce hooks are written in PHP language. For the layman, PHP is defined as an open-source scripting language that’s generally used by web developers to create custom pages or functions. Even though you’re not a developer, you can still leverage it to make fundamental changes to your store.
WooCommerce hooks work just like WordPress hooks. The only major difference is that WooCommerce hooks only work within the WooCommerce ecosystem while WordPress hooks work on WordPress-powered websites.
That being said, you can use WooCommerce hooks to design a store that’s personalized around your business needs and strengthens your customers’ shopping experience.
What are the types of WooCommerce hooks?
There are two major types of WooCommerce hooks: action and filter. While both are important in helping you create a custom WooCommerce store, they perform different functions. Action hooks allow you to run custom functions on your store, while filter hooks come in handy to help you make certain changes to your store.
What is an action hook?
Action hooks allow you to add data and change how WooCommerce operates by default. They also come in handy for plugging in additional features and extending your store’s functionality beyond its default capacity.
In simple terms, action hooks allow you to add new functions to your store. Here are some of the things you can add to your WooCommerce store using action hooks:
- Extra widgets
- New categories
- New field to checkout
- Shipping rates
- Form for lost password
- A message thanking customers after they’ve ordered something
An action hook syntax looks exactly like this: do_action('action_name');
What is a filter hook?
Filter hooks allow you to modify existing data in WooCommerce during execution. Data here can be a simple text, HTML element, or PHP variable. Filter hooks allow you, as an ecommerce store owner, to modify the default behavior of a specific function. This implies that you can reconfigure or alter how an existing page, text, or PHP variable looks or functions.
You can use filter hooks to:
- Change a text string (words, letters, numbers, and characters)
- Prevent a post from going to the trash when it’s deleted
- Change your checkout button to another color
A filter hook syntax looks exactly like this: apply_filter( 'filter_name', $ variable
What are the benefits of using WooCommerce hooks?
Instead of modifying your WooCommerce plugin or theme directly, you can use hooks to effortlessly customize your store’s styling and functionalities. The best part is that WooCommerce hooks keep your custom codes independent of your theme. What this means is that any designs made on your store using WooCommerce hooks will run even if you change your theme or update your plugin.
The reverse is the case if you’re editing directly in your plugin or parent’s theme functions.php. You risk losing all the custom styling you made once you update or change the theme you’re using. And if you don’t update your theme, you make your website vulnerable to attacks.
Using default WooCommerce plugins and templates to edit your store will give you limited customization options. It’s often difficult to find a plugin that offers all the solutions you need. Because of that, ecommerce owners might find themselves using multiple plugins that aren’t compatible with each other.
3 Real-life examples of WooCommerce hooks in action
If you’re wondering how to use hooks to customize your WooCommerce store, we’ve got you covered. We’ve created a demo WooCommerce store, and we’ll be using the Code Snippets plugin to add WooCommerce hooks to it.
But wait, didn’t we just say hooks are better than plugins? Technically, Code Snippets is a plugin that allows you to modify your WooCommerce store without having to install multiple plugins that can make your site slower.
The Code Snippets plugin lets you add PHP code snippets to your site. Snippets are small chunks of reusable PHP codes. You can use the plugin to make simple changes in your store using action and filter hooks.
Using the Code Snippets plugin makes it very easy to add hooks to your store. It has a clean graphic interface that allows you to add and manage snippets without any hassle. Each snippet has its entry, thereby working like mini-plugins. There’s also a fail-safe feature that lets you deactivate a single snippet on your site if you don’t have any need for it again.

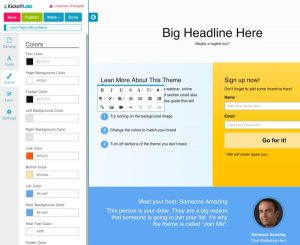
Example of a code snippet interface
Code Snippets is ideal for making minor tweaks to your store with hooks. It is less complicated—especially for someone without high-level web development knowledge.
You can follow this process to add WooCommerce hooks to your store using Code Snippets.
- Install and activate the Code Snippet plugin
- Head to Snippets and then click Add New
- Add a name for your snippet and paste the snippet in the code area.
- Choose where to run the snippet.
Here are three ways you can use Code Snippets to implement WooCommerce hooks in your store:
Login to purchase
Here, we’ll be using a code snippet to activate an action hook that prompts customers to log in before purchasing a product. Although this feature isn’t advisable to add to all of your products, it may be ideal for exclusive members-only products.
To add this feature to your WooCommerce store, add the code below to your snippet and activate it when you’re done.
add_action( 'woocommerce_before_single_product', 'quadlayers_add_message'); add_filter( 'woocommerce_is_purchasable', 'quadlayers_block_admin_purchase' ); function quadlayers_block_admin_purchase($ block) { if ( is_user_logged_in() ):return true; else:return false; endif; } function quadlayers_add_message( ){ if ( !is_user_logged_in() ):echo '<H2 style="margin-bottom:25px; text-align:center; background- font-weight:bold; ">PLEASE LOGIN TO PURCHASE THIS PRODUCT</h2>'; endif; }

Once this is done, you’ll see text highlighted on the product page that nudges the customer to log in so they can make a purchase.

Add credit card logos
Here, we will be using another action hook that lets us add trusted credit card logos on our checkout page. Adding credit card logos to your store helps give your store a sense of legitimacy. It also informs customers about the type of credit cards you accept and the ones you don’t.
To add credit card logos to your store, you can use the code below:
// Display payment methods on shopping cart page add_action( 'woocommerce_after_cart_totals', 'available_payment_methods' ); function available_payment_methods() { echo '<div class="payment-methods-cart-page"> <img src="https://ecommerce.acone.net/wp-content/uploads/2021/05/payment-2.png"/img> </div> <div class="payment-methods-message">We accept the following payment methods</div>'; }

Once you’re done, you’ll be able to see the icons on the checkout page:

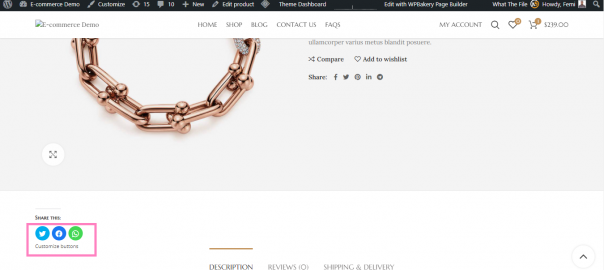
Add share icons
Adding share buttons to your WooCommerce store makes it easy for customers to let their friends and family know about your products on social media channels. This sharing leads to more eyeballs on your products which likely leads to more sales.
By default, our theme has share icons. If your theme doesn’t include share buttons, here is how you can include them on your products page using action hooks.
Create a new snippet and add the code below to it:
// Remove them from under short description remove_action( 'woocommerce_single_product_summary', 'woocommerce_template_single_sharing', 50 ); // Read above product tabs add_action( 'woocommerce_after_single_product_summary' , 'woocommerce_template_single_sharing', 5 );

Once this is done, you’ll be able to see the new share icons we added below using action hooks:

Use WooCommerce hooks to test out store ideas
Now that you know all you need to create your ideal ecommerce store try experimenting with different hooks to modify your store for a better user experience. When experimenting, make sure you test changes on a staging version. Once you’ve got things working properly, you can move the changes over to the live version.
Digital & Social Articles on Business 2 Community
(61)