— July 3, 2018
The moment you sign up as an Amazon seller, the clock starts ticking. Amazon will hold you to its monthly performance metrics from day one. And being prepared makes all the difference: with this checklist you’ll be ready to ace every step of selling on Amazon. We’ve covered everything from the most basic preparation to the next steps necessary to grow into your success.
First things first:
1. Get your paperwork in order
It’s a lot easier to start selling with your paperwork in order. Some of this will be needed for the account opening process, some of it is common sense, and some of it helps to protect your business in the future.
You’ll need:
Your business name
The name of your business. If you’re doing business as another name, things get more complex, but you’ll need this whatever you do.
You’ve got to have a valid email address. But I’d consider setting one up especially for your Amazon seller account – maybe add a new account to your business email or if you don’t have one, open a fresh Gmail and keep signed in on an alternative browser so checking it regularly is easy.
Credit card
You’ll need to have the credit card you’re going to use for your business handy and solvent.
Tax ID and State Tax
You’ll need your tax ID. If you’re selling as an individual, have your Social Security number handy; if you’re selling as a company, you’re going to need your company’s Federal Tax ID number. When you’re in the process of signing up to your Amazon account, you’ll need to fill in a 1099-K Tax Interview document:

If you’re not based in the USA, you might be asked for this in error; contact Amazon and it should be cleared up in a couple of days.
State Tax ID information is only needed for states in which you have a physical presence (‘nexus’). If you have an office in Arizona, a warehouse in Nebraska, and a factory in Minnesota, those are the states you need State Tax ID info for.
If you’re planning to use Fulfillment by Amazon (FBA), there can be other tax issues. For a single seller with a single location, FBA tax is simple. But for a multistate entity, it can get complex.
If that’s you, it’s cheaper and simpler to talk to a specialist tax attorney or adviser before you start selling on Amazon, in the same way that it’s far cheaper to have a good accountant than muddle through it all yourself. (Small business owners know what I’m talking about here!)
Companies that specialize in Amazon tax issues include:
- Taxjar.com
- Avalara.com
- Taxify.co
- Vertexsmb.com
- FBAsalestax.com
- Zip-tax.com
- Catchingclouds.net
Yes, it’s just boring paperwork. But having it all set up before you start selling on Amazon is a lot less irritating than chasing it around on a time limit. And if you don’t have the tax info to hand to fill out your 1099-K, you won’t be able to sell on Amazon at all until you do.
2. Figure out your logistics in advance
Once you jump in and actually start selling on Amazon, fixing these logistical issues becomes much harder. It’s easier to set things up so they never become a problem in the first place.
You’ll need to know:
Your returns process
Amazon has its own internal returns policy which you have to meet or exceed in order to be an Amazon seller. It’s a good idea to read this page, figure out what you’re going to do that’s at least as good as Amazon’s policy, and write that down somewhere, even if it’s a sticky note on your desktop. When you get an item returned, that’s the wrong time to be figuring out what to do about it – especially since you only have a 24-hour window to begin the process.
How (and if) you plan to use FBA
You can oversimplify and say: smaller items work with FBA, bigger ones less so. Or you can read our blog post about how to figure out if FBA is worth it for your business.
But if you’ve decided that you do want to go the FBA route, there are a couple of things you’ll need to consider.
FBA works very differently if you commingle your items. Commingled selling lets Amazon sell your items and those of other sellers interchangeably, assuming that the item is the same.
The problem with that is, you can end up with your products – which you have control over and have carefully verified – mixed up with someone else’s who hasn’t bothered checking, or is selling fake stuff on purpose. Then when an order of yours gets shipped, it’s their poor quality product that arrives – and your reputation that gets trashed.
Boardgames4us is pretty much on the money here:

There are benefits to this approach, but it’s risky. By and large standard practice should be, use FBA but don’t commingle.
Whether you want to use a DBA name on your Amazon account
Amazon lets you use a DBA (doing business as) name on your Amazon account, basically rebranding your Amazon account as something different from your main business.
There are plenty of legitimate reasons to do this – such as, you have a specific part of your business that takes place on Amazon. If you normally sell furniture of every kind but on Amazon you sell only wardrobes, Texas Furniture isn’t as good a name as Texas Wardrobes, for instance.
But there are also plenty of sketchy sellers on Amazon who use DBA to conceal the real identity of their company; you might have more credibility and trust if you just use your regular business name.
How Amazon’s product gating applies to what you want to sell
Amazon uses restrictions to decide who can sell things in certain categories. If the categories you want to sell are gated, you’ll need to apply for the ungating process as soon as possible.
Check if your products are on the gated list here.
3. Prepare your business plan
Decide your business plan in advance. Don’t try to wing it.

You don’t have to like Ike for this one to resonate. Your answers to these questions might change, even in your first month as an Amazon seller. But by planning out your first month, you force yourself to ask the questions. At the very least, ask yourself:
Are you going to sell the same products or change it up?
If you’re going to sell more opportunistically, or from a large range, this isn’t so much of an issue. But if you’re selling the same products all the time, it’s smart to take advantage of Seller Central’s replenishment alert.
How will you identify stale inventory?
However you’re selling, keeping track of inventory age is an important part of handling your supply chain. If products are sitting on the shelf for three months, that tells you something about what you need to order.
More urgently, if you’re using FBA, it’s vital to identify stale inventory so you don’t get caught in Amazon’s 180-day inventory sweeps and charged a much higher storage fee. Don’t wait 179 days and then wonder how much of your inventory is now costing you money instead of making you money.
You can find Amazon’s inventory report under Reports > Fulfillment > Manage FBA Inventory if you’re using FBA. There, you’ll find a full real-time inventory report containing numerical values for a range of inventory data – SKU, product condition and so on.

How will you source your products?
Inventory is a major issue on Amazon. Sellers who aspire to the buy box already know: you won’t get in if your product’s out of stock. You also need to avoid periods when you’re out of stock and not selling – and thus not making any money.
Only you know the most appropriate sources of inventory for your business, but make sure you have fallbacks if it’s possible so you don’t get caught out.
Who is already selling the same products as you on Amazon?
It’s pretty common for new sellers to jump in with products that are already so popular, in such crowded markets, that there’s no real chance of successfully selling them. So it’s really vital to check that you’re selling something where you have a chance at actually making a business work.
The biggest competitor on Amazon is Amazon itself – check your intended catalog against Amazon and if the company itself is selling your products, rethink your approach.
When you’re checking what’s selling on Amazon already, whether it’s being retailed by Amazon or not, look out for price points too. You’re unlikely to make a lot of headway if you’re significantly more expensive than the competition, so ask yourself whether you can make an acceptable margin, based on your overheads. (Ryan Grant says you should be looking for products you can sell for triple what you paid for them, and a 100% margin is a floor, not a ceiling.)
Speaking of which:
4. Prepare your financials
Even if you’ve opted for the leanest possible business model you’re still going to have to spend some money to make money on Amazon. If you want to do that in the most efficient way possible, you need to look deeper than the basic question of whether you’re in profit or not.
It’s usual to reach for the Pareto principle here – 80% of outcome derived from 20% of efforts. But in ecommerce, the disparity is often even higher. When you get down into the details and find out which items you sell are generating your profit, the chances are you’ll find just a handful. To make your Amazon selling career successful, you have to know which handful as early as possible.
In fact, in his guide to finding profitable products to sell on Amazon, Startup Bros’ Will Mitchell says the error that really messed him up his first time around? ‘Too many products.’ Don’t throw it at the wall and see what sticks; figure it out in advance. (Your plan won’t survive contact with reality, but it will at least let you know where you’re starting from.)
5. Get your marketing ready
Amazon is a busy, busy place. It’s one of the world’s biggest search engines. And for people looking to buy something, it’s bigger than Google.
Which is cool and all, but it means you have a lot of competition.
So, you have to do some marketing to stand out and make sure you get found by the right people.
Fortunately, hitting the ‘best practice’ basics is actually simpler on Amazon than on Google because Google is a general-purpose question-answering machine and Amazon is a list of things that are for sale.
Here’s how to get your Amazon marketing in order.
Make great product descriptions a priority
Product descriptions are what Amazon indexes to match buyers with your items. Weak product descriptions cost you sales. And many Amazon sellers have weak product descriptions, meaning great ones can help you pull out ahead of the pack. Amazon marketing, outside of paid ads, really boils down to killer product descriptions.
Crafting product descriptions is time-consuming. But it really does pay off. Here’s how to do it.
Do your keyword research
The first marketing asset you need is a list of high-performing keywords to drive traffic to your products. You want first relevancy, and then volume when you’re doing this stage: huge amounts of traffic from people who will never buy is meaningless.
There’s a bunch of tools – including from AMZDataStudio – that will round up all the backend keywords your competitors are using for the same products. Don’t reinvent the wheel – start where they are and then get better.
What’s a backend keyword?
Amazon Seller Central will let you enter your keywords into the backend of each product page, letting you tell Amazon you wish to be indexed for these terms – without throwing a bunch of spammy, keyword-stuffed product descriptions in your customers’ faces.

Don’t get carried away here. Specifically, don’t keyword stuff and don’t duplicate keywords.
Get your product images up to scratch
Product images are hugely important for ecommerce buyers. They can’t hold the item in their hand or visit your store. So product images are the next best thing to both. Low-quality images are like moldering products – they don’t sell.
Amazon publishes its own image guidelines, but here is a quick rundown of the basics:
| Photo Requirement | List Single Items | Book Loader Feeds |
| Accepted File Types | JPEG (.jpg), GIF (.gif), and PNG (.png) | JPEG (.jpg), GIF (.gif), and PNG (.png) |
| Maximum File Size | 10MB | 10MB |
| Image Resolution | 72 pixels per inch | 72 pixels per inch |
| Minimum Dimensions* | 200 x 200 pixels | One side must be at least 200 pixels but the other may be less |
| Maximum Dimensions* | 2000 x 2000 pixels | 10,000 x 10,000 pixels |
| Maximum Dimension Ratio* | 5 to 1 (2:1 or 1:1 preferred) | 5 to 1 (2:1 or 1:1 preferred) |
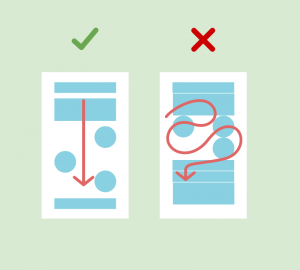
That’s the technical stuff taken care of. When you add product images, think about what they convey about your brand. Consider showing them from multiple angles if you can – remember the consumer can’t pick up the roller skate, nutcracker or whatever and turn it around in their hand like they would in a regular store. Finally, try to get a couple of product illustrations that actually show it in use.
As Peep Laja says, ‘Context matters. Don’t just show the product, show it in context. Let me imagine using it.’
Create copy for your products – don’t rely on what the manufacturers provide
This is so good, I wish I’d written it:

Manufacturers provide technical information – so many gigabytes, this many millimeters, that many grams.
Which is fine if your buyer is highly technically minded and they know that only a certain size, weight, or diameter will do. But most buyers aren’t.
That’s not to say you shouldn’t display technical information. But copying and pasting manufacturer boilerplate gives you no advantages over your competitors and makes no effort to reach out to potential customers and explain why they might actually care about that technical info in the first place.
Here’s a good example, from Amazon’s own product range:

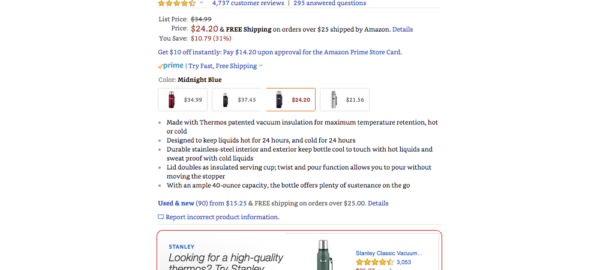
Here’s another example, from Thermos’ Stainless King flask.
The initial description is bullet points that foreground benefits:

Below this, there’s some care instructions and then the official product description:

Note that the product description provides information about technical things like size, capacity and construction materials:
‘40 oz, 1. 2 liter, stainless King midnight blue mirror finish beverage bottle, thermal Max double wall vacuum insulation for maximum temperature retention, hot or cold, keeps cold for 24 hours, keeps hot 24 hours, unbreakable 18/8 stainless steel interior & exterior, cool to the touch with hot liquids, sweat proof with cold, insulated stainless steel serving cup, twist & pour stopper lets you pour without removing the stopper, retractable handle with stainless steel links.’
But it does so in a way that’s readable and makes clear why you should care about what it’s made of, or how large it is, or what kind of stopper it has.
Manufacturer’s product descriptions suck for two reasons. One, because they’re going to be exactly the same as everyone else’s, and two, because they’re telling the reader nothing they need to know. Notwithstanding my example above, you don’t have to get all Mad Men about it – just translate it into English from technicalese, and explain why it matters.
Consider Amazon’s paid advertising
Amazon has three paid solutions to increase reach and traffic:
- Sponsored Products
- Headline Search Ads
- Product Display Ads
Amazon calls these Amazon Marketing Services, but many sellers refer to them collectively as ‘Amazon PPC.’
Sponsored Products
Sponsored Products causes product listings to appear higher than they normally would, so you appear in Amazon searches as normal. They’re marked as sponsored but otherwise look just like normal search results:

Sponsored products can be targeted in two ways:
- Automatic targeting: From the Sponsored Products Campaign Manager you can select automatic targeting, which will tell Amazon to target your ads to all relevant customer searches, based on product information.
- Manual targeting lets you select your own keywords to be displayed for.
Headline Search Ads
Headline Search Ads, featuring product listings of your choice, a logo, and a headline, are targeted to shopper searches on Amazon.

You can link your ad to a custom landing page, and you can use Amazon’s built-in ad targeting tool to decide on the keywords you want to be matched with – like a simplified version of Google’s Keyword Tool.

Product Display Ads
You’ll find Product Display Ads on:
- Product Detail Pages on Desktop and Mobile
- Search Results Pages
- Customer Review Pages
- Top of the Offer Listing Pages
Here’s one on the Thermos page we looked at earlier:

And here’s another, from the same product page:

Best practice is to experiment with just one product (one ASIN – Amazon Standard Identification Number) and get the process dialed in, and see if it works for you. Andrew Maffetone of Seller’s Choice says:
‘When we do Product Display Ads for our Amazon sellers we like to take one ASIN and create a campaign targeting competitors ASINs. As we optimize and get the ACoS within our target, we add more and more competitors. After a while, we’ll create more campaigns based on complementary products. So, if we’re selling belts I may create a Product Display Ad campaign directed at jeans.’
If you take a fire-and-forget approach to Amazon PPC, you’ll get fire-and-forget results – misses, in other words. But if you’re both aggressive on the most important keywords, and scientific about finding out what they are, you can make huge changes in rankings for those keywords.
The big advantage of Amazon PPC is that its effects pay off after you stop paying for ads. If you’re struggling to rank for a keyword and you throw some money at PPC it can get you over the hump, so that increased exposure becomes self-stoking and outlasts the paid ad campaign.
Once Amazon products are making a competitive number of daily sales, they’ll hold good raking position on their own – but AMS can get you there in the first place.
Actively solicit positive customer reviews
Customer reviews are supremely important. That’s true across verticals, business sectors, everything. 70% of customers will leave a review if asked – but they don’t get asked. If you know your customer service is great and your product’s solid, ask customers to leave you a review.
Make it an active part of marketing that you devote a little time and effort to in advance – set up an automated email system that reaches out to recent purchasers and asks them for reviews.
JumpSend’s Greg Mercer recommends asking for reviews a couple of days after an initial post-purchase email:

Here’s his script for that initial email:
Hi {{ Buyer First Name }},
Thank you again for your order of {{ Product Name }}. According to our records, it was delivered a few days ago.
If there was anything wrong with your order, please let us know right away so we can fix this. And if you have any questions, we are always here to help!
We hope you’re enjoying your new {{ Product Name }}.
If you think we’ve done a good job, I would really appreciate it if you would leave us your feedback by clicking on the following link. {{ Seller Feedback Link }}
I have just one small favor to ask you… If you are happy with your purchase, I’d really appreciate it if you could just take a few seconds to leave feedback on your buying experience and our product. It really helps to spread the word about {{ Insert Product Mission }}!
{{ Product Review Link Stars }}
Sincerely,
Greg
Amazon third-party automated email services include:
- FeedbackFive
- Feedback Genius
- Feedbackz
- Feedback Express
- Kibly
- ZonGuru
- Bqool
Remember that your emails have to pertain directly to the order in question. You can’t start sending people marketing emails through this channel – it’s a violation of Amazon’s ToS.
6. See what sells – and how
There’s no data like your data, because there’s no business exactly like your business. Best practices can take you only so far; the real discoveries are made by experiment. As soon as possible, start getting information about how your business operates that you can use to make real improvements.
Prioritize selling a few products initially so you can see how they perform
Number one business mistake? Trying to be all things to all people. Imagine running a restaurant that caters to all tastes. It’s the ‘too many products’ issue that Will Mitchell talks about. Instead, use a small number of products and see how they perform. Watch what sells and what doesn’t and adapt your strategy accordingly.
Get sales feedback
Sales feedback is important to Amazon in assessing new sellers. They’re watching these numbers. You should be too. There are a host of third-party Amazon sales feedback tools that let you track how your products are actually performing by sending each new customer a request for feedback.
Consider simple split testing
Split testing – sometimes called A/B testing – has a rep for being complex. But it’s just a way of figuring out which way of doing something is most effective. Even when you have a listing that looks solidly optimized, split testing can show you how to improve it, sometimes quite drastically.
There’s no need to try to set up split testing manually. Amazon has multiple third-party tools designed to make split testing simple and easy.
Tools include:
- Listing Dojo
- Splitly
- CashCowPro
Things to split test initially include product title, bullet points, product descriptions, images – everything that goes into the basics of a listing. And don’t forget about price!
While you might not want to be doing this out of the gate, you should be doing it as soon as possible. Best practice quickly becomes table stakes; everyone knows it, so it becomes the price of being in the top 90%. Getting into the top 20% requires some investigation of your own data.
Conclusion
Becoming a successful Amazon seller requires preparation. The first 30 days are critical – get a bad reputation here and it’s hard to shift. Earn a good one and you can build on it.
That’s why it’s important to have everything in place, from inventory through finances to marketing, before you start selling. The more work you’ve done behind the scenes before you start selling, the fewer beginner’s mistakes you’ll make. You’ll spend less money on inventory, buy fewer things that don’t sell, and you’ll go into it clear-eyed, understanding what your business is to your customers and why they buy from you.
Digital & Social Articles on Business 2 Community
(80)